
iOS 圖片拉伸實作:resizableImageWithCapInsets 用法解析
編輯:iOS 技巧大全
做按鈕背景時經常遇到這個問題:一張小圖要撐成很寬的按鈕,直接放大後兩端的圓角就變形了。正確做法是把圖片分成「不變形區」與「可拉伸區」。
原始素材

尺寸為 25 × 28 pixels。
建立兩個按鈕對比
UIButton *button = [UIButton buttonWithType:UIButtonTypeCustom];
button.frame = CGRectMake(50, 100, 25, 28);
[button setBackgroundImage:[UIImage imageNamed:@"btn.png"]
                  forState:UIControlStateNormal];
[self.view addSubview:button];
UIButton *button1 = [UIButton buttonWithType:UIButtonTypeCustom];
button1.frame = CGRectMake(50, 200, 200, 28);
UIImage *image = [UIImage imageNamed:@"btn.png"];
[button1 setBackgroundImage:image forState:UIControlStateNormal];
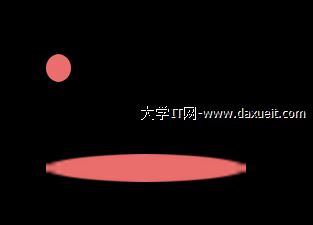
[self.view addSubview:button1];第一個按鈕尺寸與原圖相同,顯示正常;第二個被拉寬到 200,未經處理的話左右兩端的邊框會被明顯拉伸變形:
iOS 5.0 的解法
iOS 5 為 UIImage 新增了處理拉伸的方法:
- (UIImage *)resizableImageWithCapInsets:(UIEdgeInsets)capInsetscapInsets 的觀念是:把圖片切成九宮格,四個角保持原樣,只拉伸中央那一塊。
CGFloat left  = 12;   // 左端固定寬度
CGFloat right = 12;   // 右端固定寬度
UIEdgeInsets insets = UIEdgeInsetsMake(0, left, 0, right);

// 重新賦值
UIImage *new = [image resizableImageWithCapInsets:insets];
[button1 setBackgroundImage:new forState:UIControlStateNormal];
[self.view addSubview:button1];
iOS 6.0 的增強版本
iOS 6 又提供了帶 resizingMode 參數的重載版本:
- (UIImage *)resizableImageWithCapInsets:(UIEdgeInsets)capInsets
                            resizingMode:(UIImageResizingMode)resizingMode
相比 iOS 5 的版本只多了一個參數,用來指定中央區域的填充方式:
- UIImageResizingModeStretch:拉伸模式,把 capInsets 指定的中央矩形拉伸填滿。
- UIImageResizingModeTile:平鋪模式,重複貼上中央矩形直到填滿。這對製作有紋理的背景(例如紙張、布紋)特別有用。
CGFloat left  = 12;
CGFloat right = 12;
UIEdgeInsets insets = UIEdgeInsetsMake(0, left, 0, right);

UIImage *new = [image resizableImageWithCapInsets:insets
                                    resizingMode:UIImageResizingModeStretch];
[button1 setBackgroundImage:new forState:UIControlStateNormal];
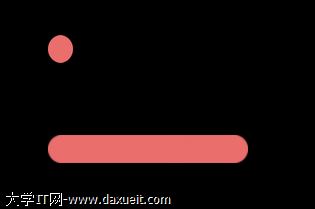
處理後的效果:
設定 capInsets 的實務經驗
left 與 right 的值必須小於原圖寬度的一半,否則左右兩個固定區會重疊,系統會出現非預期的渲染結果。以這張 25 pixels 寬的圖為例,左右各設 12 剛好接近上限,是合理的最大值。
另外,從 iOS 5 開始 Apple 推薦直接用 resizableImageWithCapInsets: 搭配 Asset Catalog 的 slicing 設定來處理,不必在程式碼中硬編碼數值——把拉伸參數配置在圖片資源上,設計師調整素材時你完全不用改程式碼。