
菜鳥版自定義進度條:用 NSTimer 一格一格往前推
編輯:iOS 技巧大全
做進度條有很多種思路。這個版本是最直覺的一種:一個底色槽、一個填充條,再用 NSTimer 週期性地把填充條變寬,同時用一個數字標籤顯示百分比。程式碼很淺,適合當作入門練習。
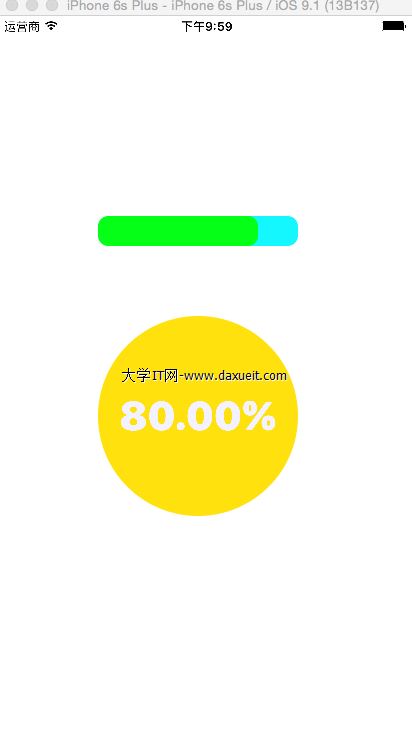
自訂 View 的宣告
#import <UIKit/UIKit.h>

@interface MYjindutiao : UIView
@property (strong, nonatomic) UIView  *aview;  // 外層軌道
@property (strong, nonatomic) UIView  *bview;  // 內層填充
@property (strong, nonatomic) UILabel *laber;  // 百分比文字
@property (strong, nonatomic) NSTimer *time;
@property (assign, nonatomic) int a;           // 填充條的目標寬度
@end
實作
#import "MYjindutiao.h"

@implementation MYjindutiao

- (instancetype)initWithFrame:(CGRect)frame {
    self = [super initWithFrame:frame];
    if (self) {
        // 外層軌道
        self.aview = [[UIView alloc] initWithFrame:CGRectMake(100, 100, 200, 30)];
        self.aview.backgroundColor = [UIColor colorWithRed:0.082 green:0.969 blue:1.000 alpha:1.000];
        self.aview.layer.cornerRadius = 10;
        self.aview.layer.masksToBounds = YES;

        // 內層填充,初始寬度為 0
        self.bview = [[UIView alloc] initWithFrame:CGRectMake(0, 0, 0, 30)];
        self.bview.backgroundColor = [UIColor colorWithRed:0.020 green:1.000 blue:0.085 alpha:1.000];
        self.bview.layer.cornerRadius = 10;
        self.bview.layer.masksToBounds = YES;

        // 圓形標籤顯示百分比
        self.laber = [[UILabel alloc] initWithFrame:CGRectMake(100, 200, 200, 200)];
        self.laber.backgroundColor = [UIColor colorWithRed:1.000 green:0.885 blue:0.050 alpha:1.000];
        self.laber.layer.cornerRadius = 100;
        self.laber.layer.masksToBounds = YES;
        self.laber.textAlignment = NSTextAlignmentCenter;
        self.laber.font = [UIFont systemFontOfSize:40];
        self.laber.textColor = [UIColor colorWithRed:0.957 green:0.950 blue:1.000 alpha:1.000];

        [self addSubview:self.aview];
        [self.aview addSubview:self.bview];
        [self addSubview:self.laber];

        // 每 0.01 秒推進一次
        self.time = [NSTimer scheduledTimerWithTimeInterval:0.01
                                                    target:self
                                                  selector:@selector(change)
                                                  userInfo:nil
                                                   repeats:YES];
        [[NSRunLoop mainRunLoop] addTimer:self.time forMode:NSDefaultRunLoopMode];
    }
    return self;
}

- (void)change {
    CGRect chFrame = self.bview.frame;
    chFrame.size.width += 0.25;
    self.bview.frame = chFrame;

    self.laber.text = [NSString stringWithFormat:@"%.2f%%", self.bview.frame.size.width / 2];

    if (self.bview.frame.size.width == self.a) {
        [self.time invalidate];   // 達標就停止計時器
    }
}

@end
使用方式
#import <UIKit/UIKit.h>
#import "MYjindutiao.h"

@interface ViewController : UIViewController
@property (strong, nonatomic) MYjindutiao *jindutiao;
@end
#import "ViewController.h"

@implementation ViewController

- (void)viewDidLoad {
    [super viewDidLoad];
    self.jindutiao = [[MYjindutiao alloc] initWithFrame:CGRectMake(0, 100, 300, 500)];
    self.jindutiao.a = 160;          // 目標寬度
    [self.view addSubview:self.jindutiao];
}

@end
這個版本可以更好的地方
如果拿它當作正式元件,有幾個地方值得調整:
改用 CADisplayLink。NSTimer 的觸發精度受 run loop 模式影響,且 0.01 秒的間隔對 timer 來說太密,實際不會那麼準。CADisplayLink 與螢幕刷新同步,是動畫的首選。
用浮點數比較取代整數相等。程式碼裡用 width == self.a 判斷是否終止,累加浮點數會有精度誤差,建議改成 >=,或乾脆用「剩餘比例」來計算每帧增量。
用 CALayer 動畫取代逐格繪製。如果只是要一個平滑的進度條,直接對 bview 的 transform 或 layer 做動畫即可,不必每 0.01 秒重設 frame。
記得 invalidate。計時器若在 view 銷毀時未 invalidate,會造成 timer 強參照 self 無法釋放的問題。可在 dealloc 或 view 離開時處理。