玩轉UITableView系列(一)
UITableView這個iOS開發中永遠繞不開的UIView,那麼就不可避免的要在多個頁面多種場景下反復摩擦UITableView,就算是剛跳進火坑不久的iOS Developer也知道實現UITableView的數據源dataSource和代理delegate,寫出一個UITableView也就基本OK了,但是這僅僅是寫出一個UITableView而已,作為一個有想法的程序猿,要做的還有很多,如何利用UITableViewCell的重用機制,如何提高性能等,這些留在後面的系列中一一講述,那麼本文要解決的痛點又是什麼呢?回答這個問題之前,我們先來看看上面提到的UITableView的兩大核心:UITableViewDataSource、UITableViewDelegate!
一、UITableViewDataSource
UITableView需要一個數據源(dataSource)來顯示數據,UITableView會向數據源查詢一共有多少行數據以及每一行顯示什麼數據等。沒有設置數據源的UITableView只是個空殼。凡是遵守UITableViewDataSource協議的OC對象,都可以是UITableView的數據源。查看源碼:


@required  // 必須實現

// 每個section的行數
- (NSInteger)tableView:(UITableView *)tableView numberOfRowsInSection:(NSInteger)section;

// 第section分區第row行的UITableViewCell對象
- (UITableViewCell *)tableView:(UITableView *)tableView cellForRowAtIndexPath:(NSIndexPath *)indexPath;

@optional  // 可選實現

// section個數,默認是1
- (NSInteger)numberOfSectionsInTableView:(UITableView *)tableView;

// 第section分區的頭部標題
- (nullable NSString *)tableView:(UITableView *)tableView titleForHeaderInSection:(NSInteger)section;

// 第section分區的底部標題
- (nullable NSString *)tableView:(UITableView *)tableView titleForFooterInSection:(NSInteger)section;

// 某一行是否可以編輯(刪除)
- (BOOL)tableView:(UITableView *)tableView canEditRowAtIndexPath:(NSIndexPath *)indexPath;

// 某一行是否可以移動來進行重新排序
- (BOOL)tableView:(UITableView *)tableView canMoveRowAtIndexPath:(NSIndexPath *)indexPath;

// UITableView右邊的索引欄的內容
// return list of section titles to display in section index view (e.g. "ABCD...Z#")
- (nullable NSArray<NSString *> *)sectionIndexTitlesForTableView:(UITableView *)tableView;
UITableViewDataSourc 二、UITableViewDelegate 通常都要為UITableView設置代理對象(delegate),以便在UITableView觸發一下事件時做出相應的處理,比如選中了某一行。凡是遵守了UITableViewDelegate協議的OC對象,都可以是UITableView的代理對象。一般會讓控制器充當UITableView的dataSource和delegate。查看源碼:
@protocol UITableViewDelegate<NSObject, UIScrollViewDelegate>

@optional

// 每行高度
- (CGFloat)tableView:(UITableView *)tableView heightForRowAtIndexPath:(NSIndexPath *)indexPath;

// 每個section頭部高度
- (CGFloat)tableView:(UITableView *)tableView heightForHeaderInSection:(NSInteger)section;

// 每個section底部高度
- (CGFloat)tableView:(UITableView *)tableView heightForFooterInSection:(NSInteger)section;

// 每個section頭部自定義UIView
- (nullable UIView *)tableView:(UITableView *)tableView viewForHeaderInSection:(NSInteger)section;

// 每個section底部自定義UIView
- (nullable UIView *)tableView:(UITableView *)tableView viewForFooterInSection:(NSInteger)section;

// 是否允許高亮
- (BOOL)tableView:(UITableView *)tableView shouldHighlightRowAtIndexPath:(NSIndexPath *)indexPath NS_AVAILABLE_IOS(6_0);

// 選中某行
- (void)tableView:(UITableView *)tableView didSelectRowAtIndexPath:(NSIndexPath *)indexPath;
UITableViewDelegate
到這裡已經很明確了,在需要實現UITableView的控制器對象裡,就不可避免的要設置數據源和設置代理,那麼就不可避免的需要實現以上提到的那些代理方法,試想一下,如果不進行有效的封裝,那極有可能每個需要UITableView的Controller裡都有如下重復的代碼行:
#pragma mark - UITableViewDelegate
- (CGFloat)tableView:(UITableView *)tableView heightForHeaderInSection:(NSInteger)section {
    return 0.000001;
}

- (CGFloat)tableView:(UITableView *)tableView heightForFooterInSection:(NSInteger)section{
    return 0.000001;
}

- (NSInteger)numberOfSectionsInTableView:(UITableView *)tableView{
    return 0;
}

- (CGFloat)tableView:(UITableView *)tableView heightForRowAtIndexPath:(NSIndexPath *)indexPath{
    return 0.000001;
}

- (NSInteger)tableView:(UITableView *)tableView numberOfRowsInSection:(NSInteger)section{
    return 0;
}

- (UIView*)tableView:(UITableView *)tableView viewForHeaderInSection:(NSInteger)section{
    return nil;
}

- (UIView*)tableView:(UITableView *)tableView viewForFooterInSection:(NSInteger)section{
    return nil;
}

- (UITableViewCell *)tableView:(UITableView *)tableView cellForRowAtIndexPath:(NSIndexPath *)indexPath{
    UITableViewCell *cell = [[UITableViewCell alloc] initWithStyle:UITableViewCellStyleDefault reuseIdentifier:@"defaultType"];
    return  cell;
}

- (void)tableView:(UITableView *)tableView didSelectRowAtIndexPath:(NSIndexPath *)indexPath{
    return;
}

// lazy load
- (UITableView*)tableView{
    if (!_tableView) {
        _tableView = [[UITableView alloc] initWithFrame:CGRectMake(0, -64, KS_Width, KS_Heigth+64) style:UITableViewStyleGrouped];
        _tableView.delegate = (id)self;
        _tableView.dataSource = (id)self;
        [_tableView setSectionHeaderHeight:0];
        _tableView.separatorStyle = UITableViewCellSeparatorStyleNone;
        _tableView.showsVerticalScrollIndicator = NO;
        _tableView.showsHorizontalScrollIndicator = NO;
    }
    return _tableView;
}
重復代碼塊
這已經是夠災難的了,如果在項目周期中再遇到某個或者多個頁面設計UI設計頻繁的變動,那簡直不敢想象,哪怕每次只是一點小小的改動,也可能需要修改上面重復代碼塊中UITableViewDelegate的多個地方,如新插入一行row或者一個section,所有涉及到section或者row的地方或許都需要更改!!!
OK,我現在可以回答上面的問題了,這邊文章到底是做什麼的?解決的痛點在那裡?---解耦封裝、簡化代碼、適者生存!
從重復代碼塊我們可以看出,一般會讓控制器充當UITableView的dataSource和delegate,那麼既然要解耦,那麼就要打破思維定式,讓UITableView自己做自己的dataSource和delegate!畢竟我的地盤我做主嘛!其次將UITableViewCell進行block封裝對象化,讓其所有的屬性都自我集成。
一、首先來看UITableViewCell的封裝 --ZTCoolTableViewCell
@class UIView;
@class UITableViewCell;
@class UITableView;
@class NSIndexPath;

// 創建section頭部 Or section底部的block
typedef UIView *(^buildCell)(UITableView *tableView, NSInteger section);
// 創建section對應的row數據源的block
typedef UITableViewCell *(^buildCellInfo)(UITableView *tableView, NSIndexPath *indexPath);
// 點擊section對應row的事件block
typedef void (^clickBlock)(UITableView *tableView, NSIndexPath *indexPath);
// ZTCoolTableCellList刷新block
typedef void (^refreshBlock)();

@interface ZTCoolTableViewCell : NSObject

// 行高度
@property (nonatomic,assign) CGFloat height;
// 構造行
@property (nonatomic, copy) buildCell buildCell;

@end

@interface ZTCoolTableCellList : NSObject

// 頭部
@property (nonatomic,strong) ZTCoolTableViewCell * headCell;
// 底部
@property (nonatomic,strong) ZTCoolTableViewCell * footCell;
// 構造行
@property (nonatomic,copy) buildCellInfo buildCellInfo;
// 列高(等於0表示自適應)
@property (nonatomic,assign) CGFloat cellHeigth;
// 行數量
@property (nonatomic,assign) NSInteger cellCount;
// 行點擊事件
@property(nonatomic,copy) clickBlock clickBlock;
// 刷新事件(適用於需要動態更新tableview布局:新增或者刪減section/row)
@property(nonatomic,copy) refreshBlock refreshBlock;
// 行標識
@property (nonatomic,copy) NSString *identifier;
@property (nonatomic,copy) NSString *xibName;

// 簡單初始化 (單行cell)
- (ZTCoolTableCellList *)initSimpleCell:(CGFloat)cellHeight
                              buildCell:(buildCellInfo)buildCell
                              clickCell:(clickBlock)clickCell;

// 復雜初始化 - 不可刷新
- (ZTCoolTableCellList *)initComplexCellNoRefresh:(CGFloat)headHeigth
                                        buildHead:(buildCell)buildHead
                                       footHeight:(CGFloat)footHeight
                                        buildFoot:(buildCell)buildFoot
                                       cellHeight:(CGFloat)cellHeight
                                        buildCell:(buildCellInfo)buildCell
                                        clickCell:(clickBlock)clickCell
                                        cellCount:(NSInteger)cellCount
                                       identifier:(NSString *)identifier
                                          xibName:(NSString *)xibName;

// 復雜初始化 - 可刷新
- (ZTCoolTableCellList *)initComplexCellHasRefresh:(CGFloat)headHeigth
                                         buildHead:(buildCell)buildHead
                                        footHeight:(CGFloat)footHeight
                                         buildFoot:(buildCell)buildFoot
                                        cellHeight:(CGFloat)cellHeight
                                         buildCell:(buildCellInfo)buildCell
                                         clickCell:(clickBlock)clickCell
                                       refreshCell:(refreshBlock)refreshCell
                                         cellCount:(NSInteger)cellCount
                                        identifier:(NSString *)identifier
                                           xibName:(NSString *)xibName;
@end
.h文件
@implementation ZTCoolTableViewCell

@end

@implementation ZTCoolTableCellList

// 簡單初始化
- (ZTCoolTableCellList *)initSimpleCell:(CGFloat)cellHeight
                              buildCell:(buildCellInfo)buildCell
                              clickCell:(clickBlock)clickCell{

    return [self initComplexCellNoRefresh:0 buildHead:nil footHeight:0 buildFoot:nil cellHeight:cellHeight buildCell:buildCell clickCell:clickCell cellCount:1 identifier:nil xibName:nil];
}

// 復雜初始化 - 不可刷新
- (ZTCoolTableCellList *)initComplexCellNoRefresh:(CGFloat)headHeigth
                                        buildHead:(buildCell)buildHead
                                       footHeight:(CGFloat)footHeight
                                        buildFoot:(buildCell)buildFoot
                                       cellHeight:(CGFloat)cellHeight
                                        buildCell:(buildCellInfo)buildCell
                                        clickCell:(clickBlock)clickCell
                                        cellCount:(NSInteger)cellCount
                                       identifier:(NSString *)identifier
                                          xibName:(NSString *)xibName{

    if(headHeigth >0){
        self.headCell = [[ZTCoolTableViewCell alloc] init];
        self.headCell.height = headHeigth;
        self.headCell.buildCell = buildHead;
    }

    if(footHeight >0){
        self.footCell = [[ZTCoolTableViewCell alloc] init];
        self.footCell.height = footHeight;
        self.footCell.buildCell = buildFoot;
    }

    self.cellHeigth = cellHeight;
    self.buildCellInfo = buildCell;
    self.clickBlock = clickCell;
    self.cellCount = cellCount;
    self.identifier = identifier;
    self.xibName = xibName;

    return self;
}

// 復雜初始化 - 可刷新
- (ZTCoolTableCellList *)initComplexCellHasRefresh:(CGFloat)headHeigth
                                         buildHead:(buildCell)buildHead
                                        footHeight:(CGFloat)footHeight
                                         buildFoot:(buildCell)buildFoot
                                        cellHeight:(CGFloat)cellHeight
                                         buildCell:(buildCellInfo)buildCell
                                         clickCell:(clickBlock)clickCell
                                       refreshCell:(refreshBlock)refreshCell
                                         cellCount:(NSInteger)cellCount
                                        identifier:(NSString *)identifier
                                           xibName:(NSString *)xibName{

    if(headHeigth >0){
        self.headCell = [[ZTCoolTableViewCell alloc] init];
        self.headCell.height = headHeigth;
        self.headCell.buildCell = buildHead;
    }

    if(footHeight >0){
        self.footCell = [[ZTCoolTableViewCell alloc] init];
        self.footCell.height = footHeight;
        self.footCell.buildCell = buildFoot;
    }

    self.cellHeigth = cellHeight;
    self.buildCellInfo = buildCell;
    self.clickBlock = clickCell;

    if(refreshCell){
        self.refreshBlock = refreshCell;
    }

    self.cellCount = cellCount;
    self.identifier = identifier;
    self.xibName = xibName;

    return self;
}
.m文件
二、讓UITableView自己做自己的dataSource和delegate --ZTCoolTableViewBase
@class ZTCoolTableCellList;

@interface ZTCoolTableViewBase : UITableView <UITableViewDataSource, UITableViewDelegate>

// UITableView的數據集合
@property (nonatomic,strong) NSMutableArray<ZTCoolTableCellList*> *arrayTableViewCellList;

@end
.h文件
@implementation ZTCoolTableViewBase

#pragma mark-hitTest
- (UIView *)hitTest:(CGPoint)point withEvent:(UIEvent *)event{
    id view = [super hitTest:point withEvent:event];
    if(![view isKindOfClass:[UITextField class]]){
        [self endEditing:YES];
    }
    return view;
}

#pragma mark - TableViewDelegate
// section頭部高度
- (CGFloat)tableView:(UITableView *)tableView heightForHeaderInSection:(NSInteger)section {
    ZTCoolTableCellList *cellList = [self.arrayTableViewCellList objectAtIndex:section];
    if(cellList.headCell){
        return cellList.headCell.height;
    }else{
        return 0.00001;
    }
}

// section底部高度
- (CGFloat)tableView:(UITableView *)tableView heightForFooterInSection:(NSInteger)section{
    ZTCoolTableCellList *cellList = [self.arrayTableViewCellList objectAtIndex:section];
    if(cellList.footCell){
        return  cellList.footCell.height;
    }else{
        return 0.00001;
    }
}

// 有多少section
- (NSInteger)numberOfSectionsInTableView:(UITableView *)tableView{
    return [self.arrayTableViewCellList count];
}

// 改變行的高度
- (CGFloat)tableView:(UITableView *)tableView heightForRowAtIndexPath:(NSIndexPath *)indexPath{
    ZTCoolTableCellList *cellList = [self.arrayTableViewCellList objectAtIndex:[indexPath section]];
    if(cellList.cellHeigth == 0){
        UITableViewCell *cell = [self tableView:self cellForRowAtIndexPath:indexPath];
        return cell.frame.size.height;
    }else{
        return cellList.cellHeigth;
    }
}

// 每個section有多少行
- (NSInteger)tableView:(UITableView *)tableView numberOfRowsInSection:(NSInteger)section{
    ZTCoolTableCellList *cellList = [self.arrayTableViewCellList objectAtIndex:section];
    return cellList.cellCount;
}

// 頭部
- (UIView *)tableView:(UITableView *)tableView viewForHeaderInSection:(NSInteger)section{
    ZTCoolTableCellList *cellList = [self.arrayTableViewCellList objectAtIndex:section];
    if(cellList.headCell.buildCell){
        return cellList.headCell.buildCell(tableView,section);
    }else{
        return nil;
    }
}

// cell數據構造
- (UITableViewCell *)tableView:(UITableView *)tableView cellForRowAtIndexPath:(NSIndexPath *)indexPath{
    ZTCoolTableCellList *cellList = [self.arrayTableViewCellList objectAtIndex:[indexPath section]];
    return cellList.buildCellInfo(tableView,indexPath);
}

// 底部
- (UIView *)tableView:(UITableView *)tableView viewForFooterInSection:(NSInteger)section{
    ZTCoolTableCellList *cellList = [self.arrayTableViewCellList objectAtIndex:section];
    if(cellList.footCell.buildCell){
        return cellList.footCell.buildCell(tableView,section);
    }else{
        return nil;
    }
}

// 選中某個項
- (void)tableView:(UITableView *)tableView didSelectRowAtIndexPath:(NSIndexPath *)indexPath{
    ZTCoolTableCellList *cellList = [self.arrayTableViewCellList objectAtIndex:[indexPath section]];
    if(cellList.clickBlock){
        return cellList.clickBlock(tableView,indexPath);
    }
}

- (BOOL)tableView:(UITableView *)tableView shouldHighlightRowAtIndexPath:(NSIndexPath *)indexPath NS_AVAILABLE_IOS(6_0){
    return YES;
}
.m文件
如此,我們便實現了UITableViewCell的對象化封裝和Controller於UITableView數據源及代理的耦合。
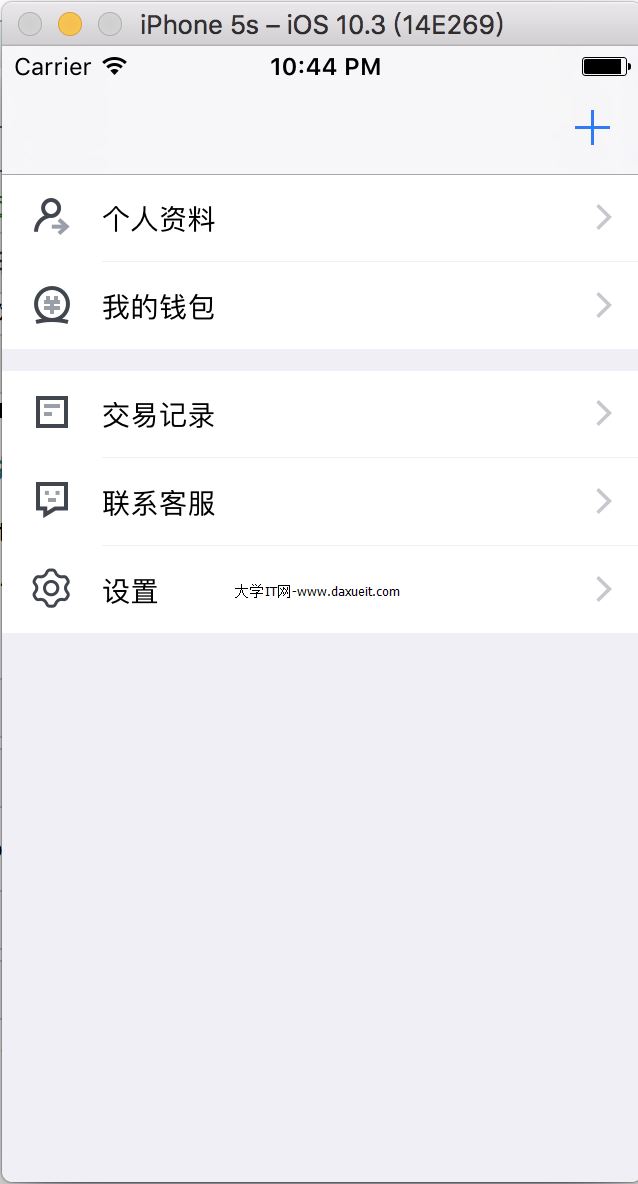
那麼如何實際運用呢?我們來舉個例子,如下圖,實現這樣一個頁面:

按照以前的思維,將控制器充當UITableView的dataSource和delegate,那麼就會出現
_tableView.delegate = (id)self;
_tableView.dataSource = (id)self;
而且每個Controller頁面都是實現的協議代理方法,一長串的重復代碼!!!
那麼現在有了新需求,需要動態的再第一個section和第二個section之間新增一個section,包括兩行row,這就需要重新代碼布局,涉及到了所有 row點擊事件極有可能需要重新綁定section與row值,對於能躺著絕對不站著的懶程序猿來說,這簡直不要太扎心!如果使用上面封裝的設計去實現,簡直不要太舒服!
一、聲明對象
// 主界面容器UITableView
@property (nonatomic,strong) ZTCoolTableViewBase   *tableView;
// 第一個section(個人資料、我的錢包)
@property (nonatomic,strong) ZTCoolTableCellList   *firstCell;
// 第二個section(交易記錄、聯系客服、設置)
@property (nonatomic,strong) ZTCoolTableCellList   *secondCell;
// 第三個section(私人日記、統計面板)
@property (nonatomic,strong) ZTCoolTableCellList   *thirdCell;
二、設置UITableView數據源和代理
- (ZTCoolTableViewBase *)tableView{
    if (!_tableView) {
        CGRect rect = [UIScreen mainScreen].bounds;
        _tableView = [[ZTCoolTableViewBase alloc] initWithFrame:rect style:UITableViewStyleGrouped];
        _tableView.arrayTableViewCellList = [[NSMutableArray alloc] initWithObjects:
                                             self.firstCell,
                                             self.thirdCell,
                                             nil];
        _tableView.delegate = _tableView;
        _tableView.dataSource = _tableView;
        _tableView.sectionHeaderHeight = 0;
        _tableView.separatorColor = [UIColor groupTableViewBackgroundColor];
    }
    return _tableView;
}
其中:
// 設置UITableView的代理為自己
 _tableView.delegate = _tableView;
// 設置UITableView的數據源為自己
_tableView.dataSource = _tableView;

// 初始化UITableView的數據對象集合
 _tableView.arrayTableViewCellList = [[NSMutableArray alloc] initWithObjects:
                                             self.firstCell,
                                             self.thirdCell,
                                             nil];
三、懶加載數據集合
#pragma mark - firstCell
- (ZTCoolTableCellList *)firstCell{
    if (!_firstCell) {
        BIWeakObj(self)
        static NSString *identifier = @"firstCell";
        _firstCell = [[ZTCoolTableCellList alloc] init];
        _firstCell = [_firstCell initComplexCellNoRefresh:0 buildHead:nil footHeight:10 buildFoot:nil cellHeight:44 buildCell:^UITableViewCell *(UITableView *tableView, NSIndexPath *indexPath) {

            UITableViewCell *cell = [selfWeak.tableView dequeueReusableCellWithIdentifier:identifier];

            if(cell == nil){
                cell = [[UITableViewCell alloc] initWithStyle:UITableViewCellStyleValue1 reuseIdentifier:identifier];
                cell.selectionStyle = UITableViewCellSelectionStyleNone;
                cell.accessoryType = UITableViewCellAccessoryDisclosureIndicator;
                cell.textLabel.font = [UIFont systemFontOfSize:14.0f];

                if(indexPath.row == 0){
                    cell.imageView.image = [UIImage imageNamed:@"ic_my_info"];
                    cell.textLabel.text = @"個人資料";
                }
                else{
                    cell.imageView.image = [UIImage imageNamed:@"ic_my_money"];
                    cell.textLabel.text = @"我的錢包";
                }
            }

            return cell;

        } clickCell:^(UITableView *tableView, NSIndexPath *indexPath) {

            [selfWeak clickCell:indexPath];

        } cellCount:2 identifier:identifier xibName:nil];
    }
    return _firstCell;
}
firstCell
#pragma mark - secondCell
- (ZTCoolTableCellList *)secondCell{
    if (!_secondCell) {
        BIWeakObj(self)
        static NSString *identifier = @"secondCell";
        _secondCell = [[ZTCoolTableCellList alloc] init];
        _secondCell = [_secondCell initComplexCellNoRefresh:0 buildHead:nil footHeight:10 buildFoot:nil cellHeight:44 buildCell:^UITableViewCell *(UITableView *tableView, NSIndexPath *indexPath) {

            UITableViewCell *cell = [selfWeak.tableView dequeueReusableCellWithIdentifier:identifier];

            if(cell == nil){
                cell = [[UITableViewCell alloc] initWithStyle:UITableViewCellStyleValue1 reuseIdentifier:identifier];
                cell.selectionStyle = UITableViewCellSelectionStyleNone;
                cell.accessoryType = UITableViewCellAccessoryDisclosureIndicator;
                cell.textLabel.font = [UIFont systemFontOfSize:14.0f];

                if(indexPath.row == 0){
                    cell.imageView.image = [UIImage imageNamed:@"ic_my_log"];
                    cell.textLabel.text = @"私人日記";
                }
                else{
                    cell.imageView.image = [UIImage imageNamed:@"ic_my_statistic"];
                    cell.textLabel.text = @"統計面板";
                }
            }

            return cell;

        } clickCell:^(UITableView *tableView, NSIndexPath *indexPath) {

            [selfWeak clickCell:indexPath];

        } cellCount:2 identifier:identifier xibName:nil];
    }
    return _secondCell;
}
secondCell
#pragma mark - thirdCell
- (ZTCoolTableCellList *)thirdCell{
    if (!_thirdCell) {
        BIWeakObj(self)
        static NSString *identifier = @"thirdCell";
        _thirdCell = [[ZTCoolTableCellList alloc] init];

        _thirdCell = [_thirdCell initComplexCellHasRefresh:0 buildHead:nil footHeight:0 buildFoot:nil cellHeight:44 buildCell:^UITableViewCell *(UITableView *tableView, NSIndexPath *indexPath) {

            UITableViewCell *cell = [selfWeak.tableView dequeueReusableCellWithIdentifier:identifier];

            if(cell == nil){
                cell = [[UITableViewCell alloc] initWithStyle:UITableViewCellStyleValue1 reuseIdentifier:identifier];
                cell.selectionStyle = UITableViewCellSelectionStyleNone;
                cell.accessoryType = UITableViewCellAccessoryDisclosureIndicator;
                cell.textLabel.font = [UIFont systemFontOfSize:14.0f];

                if(indexPath.row == 0){
                    cell.imageView.image = [UIImage imageNamed:@"ic_my_quotebill"];
                    cell.textLabel.text = @"交易記錄";
                }
                else if(indexPath.row == 1){
                    cell.imageView.image = [UIImage imageNamed:@"ic_my_service"];
                    cell.textLabel.text = @"聯系客服";
                }
                else{
                    cell.imageView.image = [UIImage imageNamed:@"ic_my_setup"];
                    cell.textLabel.text = @"設置";
                }
            }

            return cell;

        } clickCell:^(UITableView *tableView, NSIndexPath *indexPath) {

            [selfWeak clickCell:indexPath];

        } refreshCell:^{

            [selfWeak.tableView.arrayTableViewCellList insertObject:selfWeak.secondCell atIndex:1];
            [selfWeak.tableView reloadData];

        } cellCount:3 identifier:identifier xibName:nil];
    }
    return _thirdCell;
}
thirdCell
其中第三個cell可刷新(為了給第二個cell指定新增時的入口)這裡是個block:
refreshCell:^{

            [selfWeak.tableView.arrayTableViewCellList insertObject:selfWeak.secondCell atIndex:1];
            [selfWeak.tableView reloadData];

        }
新增按鈕點擊事件:
- (void)addTableviewSection:(id)sender{
    if(self.thirdCell.refreshBlock){
        self.thirdCell.refreshBlock();
    }
}
如此實現,在解耦的同時還能簡化重復代碼量,並且可以最小的代價cost適應頻繁變化的UI設計!
PS:目前的封裝只支持每個section塊的每行row高度是一樣的,如果存在不一致的需求,可在我的基礎上進行二次封裝變化,如果我的文章對您有些許幫助,幫忙點贊標星,如需轉載,請說明出處,謝謝!
demo Github地址:https://github.com/BeckWang0912/ZTCoolTableView 喜歡就標個星星吧✨✨~~~✨✨^o^
- 上一頁:iOS各種調試技巧豪華套餐
- 下一頁:圖片圓角處理


- UIScrollerview的contentsize設置
- iOS 11新UI曝光iPhone 8設計 屏下指紋即將來襲
- IOS 開發之UITextField的光標操作擴展
- UITableView中Cell重用機制導致內容重復的解決方法
- UITableViewCell在編輯狀態下背景顏色的修改方法
- IOS 中UITextField和UITextView中字符串為空和空格的解決辦法
- iOS利用UIScrollView實現圖片的縮放實例代碼
- IOS 開發之UILabel 或者 UIButton加下劃線鏈接
- IOS 開發之UIView動畫的實例詳解
- 詳解IOS UITableViewCell 的 imageView大小更改
- iOS之UIWebView無法獲取web標題的解決方法
- ios UITableView實現無數據加載占位圖片
- iOS生的搜索:UISearchController
- iOSUIView動畫詳解(ObjectiveC)
- iOSHumanInterfaceGuidelinesHomeKit