
Swift:用 SnapKit 實現鍵盤彈出時底部輸入框上浮
下面來看一篇關於 Swift 使用 SnapKit 布局、實現鍵盤彈出後底部輸入框隨之上浮的效果,希望對各位有所幫助。
使用 SnapKit 布局時,該如何實現鍵盤跟隨呢?
此前我們的頁面採用的是 Constraints 約束布局。而如果頁面元素是用 SnapKit 這個第三方布局庫來佈局的,同樣能夠實現鍵盤跟隨上移的效果。
思路依然一致:監聽鍵盤通知,隨後改變底部約束,從而觸發上移動畫。
效果圖如下:
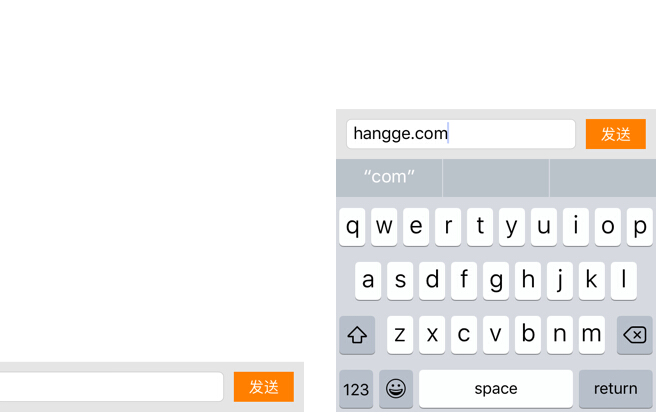
代碼如下:
import UIKit
import SnapKit
class ViewController: UIViewController {
//底部工具欄下約束
var bottomConstraint: Constraint?
//底部工具欄視圖
var toolBar = UIView()
//發送按鈕
var sendBtn = UIButton(type: .System)
//文本輸入框
var textField = UITextField()
override func viewDidLoad() {
super.viewDidLoad()
//添加底部工具欄視圖
toolBar.backgroundColor = UIColor(red: 0, green: 0, blue: 0, alpha: 0.1)
self.view.addSubview(toolBar)
//設置底部工具欄視圖約束
toolBar.snp_makeConstraints { (make) -> Void in
make.left.right.equalTo(self.view)
make.height.equalTo(50)
self.bottomConstraint = make.bottom.equalTo(self.view).constraint
}
//添加按鈕
sendBtn.setTitle("發送", forState: .Normal)
sendBtn.setTitleColor(UIColor.whiteColor(),forState: .Normal)
sendBtn.backgroundColor=UIColor.orangeColor()
sendBtn.addTarget(self,action:#selector(sendMessage(_:)),forControlEvents:.TouchUpInside)
toolBar.addSubview(sendBtn)
//設置按鈕約束
sendBtn.snp_makeConstraints { (make) -> Void in
make.width.equalTo(60)
make.height.equalTo(30)
make.centerY.equalTo(toolBar)
make.right.equalTo(toolBar).offset(-10)
}
//添加輸入框
textField.borderStyle = UITextBorderStyle.RoundedRect
toolBar.addSubview(textField)
//設置輸入框約束
textField.snp_makeConstraints { (make) -> Void in
make.left.equalTo(toolBar).offset(10)
make.right.equalTo(sendBtn.snp_left).offset(-10)
make.height.equalTo(30)
make.centerY.equalTo(toolBar)
}
//監聽鍵盤通知
NSNotificationCenter.defaultCenter().addObserver(self,
selector: #selector(ViewController.keyboardWillChange(_:)),
name: UIKeyboardWillChangeFrameNotification, object: nil)
}
//鍵盤改變
func keyboardWillChange(notification: NSNotification) {
if let userInfo = notification.userInfo,
value = userInfo[UIKeyboardFrameEndUserInfoKey] as? NSValue,
duration = userInfo[UIKeyboardAnimationDurationUserInfoKey] as? Double,
curve = userInfo[UIKeyboardAnimationCurveUserInfoKey] as? UInt {
let frame = value.CGRectValue()
let intersection = CGRectIntersection(frame, self.view.frame)
//self.view.setNeedsLayout()
//改變下約束
self.bottomConstraint?.updateOffset(-CGRectGetHeight(intersection))
UIView.animateWithDuration(duration, delay: 0.0,
options: UIViewAnimationOptions(rawValue: curve),
animations: { _ in
self.view.layoutIfNeeded()
}, completion: nil)
}
}
//發送按鈕點擊
func sendMessage(sender: AnyObject) {
//關閉鍵盤
textField.resignFirstResponder()
}
override func didReceiveMemoryWarning() {
super.didReceiveMemoryWarning()
}
}
- 上一篇文章: iOS 網絡請求常用方法詳解(基於 AFNetworking)
- 下一篇文章: Swift:把字符串按分隔符拆分為數組的兩種方法