
Swift 手寫簽名捕獲實作(畫板、預覽與存入相冊)
編輯:iOS 7 技巧
簽名功能在快遞簽收、電子合約、到場確認等場景很常見。原理其實並不玄妙——本質上就是一個精簡的畫板:捕捉手指軌跡、串成路徑、再把整個視圖渲染成一張圖片。本文用 Swift 從零做一個可重用的簽名元件。
需求拆解
- 頁面上方提供一塊簽名區(UIView),使用者可以在裡面手寫簽字。
- 點擊「預覽簽名」後,把簽名轉成 UIImage 並顯示在下方 imageView。
- 點擊「保存簽名」,把簽名寫入裝置相冊。
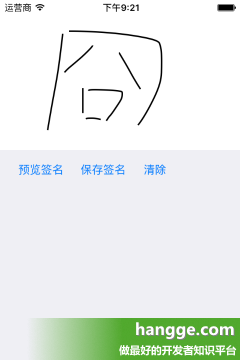
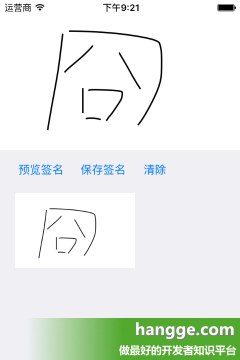
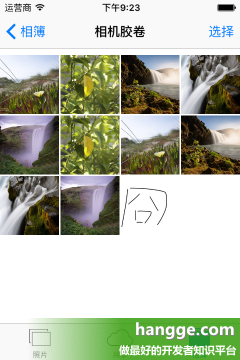
一、簽名視圖元件 DrawSignatureView.swift
這支類別負責三件事:收集觸控點、用貝茲曲線把點串成平滑線條、以及把成果輸出成 UIImage。這裡用「每四點算一段曲線」的策略,讓線條比單純的 addLineToPoint 順滑許多。
import UIKit

public class DrawSignatureView: UIView {

    // MARK: 公開屬性
    public var lineWidth: CGFloat = 2.0 {
        didSet {
            self.path.lineWidth = lineWidth
        }
    }
    public var strokeColor: UIColor = UIColor.blackColor()
    public var signatureBackgroundColor: UIColor = UIColor.whiteColor()

    // MARK: 私有屬性
    private var path = UIBezierPath()
    private var pts = [CGPoint](count: 5, repeatedValue: CGPoint())
    private var ctr = 0

    // MARK: 初始化
    override init(frame: CGRect) {
        super.init(frame: frame)
        self.backgroundColor = self.signatureBackgroundColor
        self.path.lineWidth = self.lineWidth
    }

    required public init?(coder aDecoder: NSCoder) {
        super.init(coder: aDecoder)
        self.backgroundColor = self.signatureBackgroundColor
        self.path.lineWidth = self.lineWidth
    }

    // MARK: 繪製
    override public func drawRect(rect: CGRect) {
        self.strokeColor.setStroke()
        self.path.stroke()
    }

    // MARK: 觸控處理
    override public func touchesBegan(touches: Set<UITouch>, withEvent event: UIEvent?) {
        if let firstTouch = touches.first {
            let touchPoint = firstTouch.locationInView(self)
            self.ctr = 0
            self.pts[0] = touchPoint
        }
    }

    override public func touchesMoved(touches: Set<UITouch>, withEvent event: UIEvent?) {
        if let firstTouch = touches.first {
            let touchPoint = firstTouch.locationInView(self)
            self.ctr++
            self.pts[self.ctr] = touchPoint

            // 累滿 5 點就算一段貝茲曲線
            if self.ctr == 4 {
                self.pts[3] = CGPointMake((self.pts[2].x + self.pts[4].x) / 2.0,
                                          (self.pts[2].y + self.pts[4].y) / 2.0)
                self.path.moveToPoint(self.pts[0])
                self.path.addCurveToPoint(self.pts[3], controlPoint1: self.pts[1],
                                          controlPoint2: self.pts[2])

                self.setNeedsDisplay()

                // 保留銜接資訊,繼續下一段
                self.pts[0] = self.pts[3]
                self.pts[1] = self.pts[4]
                self.ctr = 1
            }

            self.setNeedsDisplay()
        }
    }

    override public func touchesEnded(touches: Set<UITouch>, withEvent event: UIEvent?) {
        if self.ctr == 0 {
            // 只是點一下沒拖動,畫一個小點
            let touchPoint = self.pts[0]
            self.path.moveToPoint(CGPointMake(touchPoint.x - 1.0, touchPoint.y))
            self.path.addLineToPoint(CGPointMake(touchPoint.x + 1.0, touchPoint.y))
            self.setNeedsDisplay()
        } else {
            self.ctr = 0
        }
    }

    // MARK: 清空簽名
    public func clearSignature() {
        self.path.removeAllPoints()
        self.setNeedsDisplay()
    }

    // MARK: 輸出為 UIImage
    public func getSignature() -> UIImage {
        UIGraphicsBeginImageContext(CGSizeMake(self.bounds.size.width,
                                              self.bounds.size.height))
        self.layer.renderInContext(UIGraphicsGetCurrentContext()!)
        let signature: UIImage = UIGraphicsGetImageFromCurrentImageContext()
        UIGraphicsEndImageContext()
        return signature
    }
}
幾個值得留意的設計:lineWidth 用 didSet 觀察,改值時同步更新路徑;strokeColor 與 signatureBackgroundColor 開成 public,方便外部換成品牌色;getSignature() 直接渲染 layer,因此連背景色都會一起被輸出。
二、使用範例 ViewController.swift
import UIKit

class ViewController: UIViewController {

    // 簽名預覽
    @IBOutlet weak var imageView: UIImageView!

    // 簽名區域
    var drawView: DrawSignatureView!

    override func viewDidLoad() {
        super.viewDidLoad()

        // 簽名區高度固定 200
        var drawViewFrame = self.view.bounds
        drawViewFrame.size.height = 200

        drawView = DrawSignatureView(frame: drawViewFrame)
        self.view.addSubview(drawView)
    }

    // 預覽簽名
    @IBAction func previewSignature(sender: AnyObject) {
        let signatureImage = self.drawView.getSignature()
        imageView.image = signatureImage
    }

    // 保存簽名到相冊
    @IBAction func savaSignature(sender: AnyObject) {
        let signatureImage = self.drawView.getSignature()
        UIImageWriteToSavedPhotosAlbum(signatureImage, nil, nil, nil)
        self.drawView.clearSignature()
    }

    // 清除簽名
    @IBAction func clearSignature(sender: AnyObject) {
        self.drawView.clearSignature()
        self.imageView.image = nil
    }

    override func didReceiveMemoryWarning() {
        super.didReceiveMemoryWarning()
    }
}
實務上的幾點提醒
寫入相冊需要使用者授權,正式專案應先檢查並處理相簿權限被拒絕的情形;另外若簽名要隨表單一起上傳,通常會搭配前面提到的壓縮處理來縮小圖檔。元件本身已足夠獨立,直接複用到任何需要手寫輸入的畫面都可以。