
Alamofire 詳解(一):安裝配置與 GET/POST 資料請求全攻略
在 Swift 生態裡做網路請求,Alamofire 幾乎是標配。它與 Objective-C 時代的 AFNetworking 同出一源,作者直接用 Swift 重寫了這套 API,底層則是蘋果原生的 NSURLSession。本文先談它的由來、特色與安裝,再完整的走過資料請求與回應處理。
一、Alamofire 是什麼
(1)Alamofire 的前身是 AFNetworking,那是 iOS 與 OS X 上長年最受歡迎的第三方 HTTP 基礎庫。
(2)AFNetworking 的「AF」正是 Alamofire 的縮寫。
(3)Swift 問世後,原作者在 Objective-C 版本之外,用 Swift 重寫了功能對等的函式庫,這就是 Alamofire。
(4)本質上它封裝了 NSURLSession,讓取得資料、送出資料、上傳與下載檔案這些瑣碎流程,都能用更簡潔鏈式的方法完成。
二、功能特色
(1)鏈式(Chaining)風格的請求與回應方法
(2)支援 URL、JSON、plist 三種參數編碼
(3)上傳來源涵蓋 File、Data、Stream 與 MultipartFormData
(4)支援檔案下載,並可斷點續傳
(5)可透過 NSURLCredential 進行身分驗證
(6)內建 HTTP 回應狀態驗證
(7)支援 TLS 憑證與公鑰的 Pinning
(8)提供進度 Closure 與 NSProgress 整合
三、安裝與配置
(1)到 GitHub 下載最新原始碼:
https://github.com/Alamofire/Alamofire
(2)把壓縮檔中的 Alamofire.xcodeproj 直接拖進你的專案。
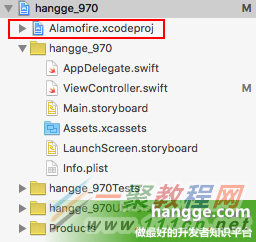
(3)到「專案」→「General」→「Embedded Binaries」,把 Alamofire.framework 加進來。
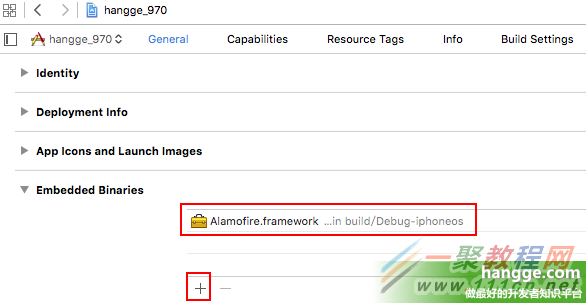
(4)需要的地方加上 import 就能用了。
import Alamofire
四、以 GET 請求為例
(1)不帶參數、不做回應處理:
Alamofire.request(.GET, "https://httpbin.org/get")
(2)帶參數、不做回應處理:
Alamofire.request(.GET, "https://httpbin.org/get", parameters: ["foo": "bar"])
(3)帶參數並處理 JSON 結果:
Alamofire.request(.GET, "https://httpbin.org/get", parameters: ["foo": "bar"])
    .responseJSON { response in
        print(response.request)  // 原始 URL 請求
        print(response.response) // URL 回應
        print(response.data)     // 伺服器回傳的資料
        print(response.result)   // 序列化後的結果

        if let JSON = response.result.value {
            print("JSON: \(JSON)")
        }
    }
五、回應處理(Response Handling)
除了上面使用的 responseJSON,Alamofire 還提供了多種回應方法,對應不同型別的伺服器輸出:
response()
responseData()
responseString(encoding: NSStringEncoding)
responseJSON(options: NSJSONReadingOptions)
responsePropertyList(options: NSPropertyListReadOptions)
通用 Response Handler,一次拿到 request、response、data、error 四項:
Alamofire.request(.GET, "https://httpbin.org/get", parameters: ["foo": "bar"])
    .response { request, response, data, error in
        print(request); print(response); print(data); print(error)
    }
Response Data Handler:
Alamofire.request(.GET, "https://httpbin.org/get", parameters: ["foo": "bar"])
    .responseData { response in
        print(response.request); print(response.response); print(response.result)
    }
Response String Handler:
Alamofire.request(.GET, "https://httpbin.org/get")
    .responseString { response in
        print("Success: \(response.result.isSuccess)")
        print("Response String: \(response.result.value)")
    }
Response JSON Handler:
Alamofire.request(.GET, "https://httpbin.org/get")
    .responseJSON { response in debugPrint(response) }
鏈式串接多個回應處理也完全支援:
Alamofire.request(.GET, "https://httpbin.org/get")
    .responseString { response in
        print("Response String: \(response.result.value)")
    }
    .responseJSON { response in
        print("Response JSON: \(response.result.value)")
    }
六、請求方法(HTTP Methods)
除了範例中的 GET,Alamofire 定義了完整的 Method 列舉:
public enum Method: String {
    case OPTIONS, GET, HEAD, POST, PUT, PATCH, DELETE, TRACE, CONNECT
}
要改用 POST,只要替換第一個參數:
Alamofire.request(.POST, "https://httpbin.org/post")
七、請求參數(Parameters)
(1)GET 請求時,參數會自動拼接到網址後方:
Alamofire.request(.GET, "https://httpbin.org/get", parameters: ["foo": "bar"])
// 實際請求:https://httpbin.org/get?foo=bar
(2)POST 請求時,參數放在 HTTP body 中傳送,網址上看不到,也支援巢狀結構:
let parameters = [
    "foo": "bar",
    "baz": ["a", 1],
    "qux": [
        "x": 1,
        "y": 2,
        "z": 3
]

Alamofire.request(.POST, "https://httpbin.org/post", parameters: parameters)
// HTTP body: foo=bar&baz[]=a&baz[]=1&qux[x]=1&qux[y]=2&qux[z]=3
八、參數編碼方式(Parameter Encoding)
除了預設編碼,還可指定 URL、URLEncodedInURL、JSON、Property List,甚至自訂格式:
enum ParameterEncoding {
    case URL
    case URLEncodedInURL
    case JSON
    case PropertyList(format: NSPropertyListFormat, options: NSPropertyListWriteOptions)
    case Custom((URLRequestConvertible, [String: AnyObject]?) -> (NSMutableURLRequest, NSError?))

    func encode(request: NSURLRequest, parameters: [String: AnyObject]?) -> (NSURLRequest, NSError?) { ... }
}
例如把字典以 JSON 格式 POST 出去:
let parameters = [
    "foo": [1, 2, 3],
    "bar": [
        "baz": "qux"
    ]
]

Alamofire.request(.POST, "https://httpbin.org/post", parameters: parameters, encoding: .JSON)
// HTTP body: {"foo": [1, 2, 3], "bar": {"baz": "qux"}}
九、自訂 HTTP 標頭
let headers = [
    "Authorization": "Basic QWxhZGRpbjpvcGVuIHNlc2FtZQ==",
    "Content-Type": "application/x-www-form-urlencoded"
]

Alamofire.request(.GET, "https://httpbin.org/get", headers: headers)
    .responseJSON { response in debugPrint(response) }
實務上最常自訂的就是 Authorization 與 Content-Type 這兩個欄位,特別是在串接需要 Token 驗證的後端 API 時。下一篇接著談檔案上傳的實作。