
iOS 開發實作:打造一個密碼產生器 App
本教學透過實作一個 iOS 密碼產生器,來學習 iOS 專案開發。透過這個範例,我們能理解 iOS 中 MVC 設計模式的應用,並加深對拖拉介面實作技術的掌握。
透過仿製密碼產生器軟體來練習 iOS 開發,能加深對 MVC 設計模式的理解,同時複習並掌握以前所學的點點滴滴。由於參考的例子是用拖拉介面實作,為了更好地學習 iOS 開發,我改用純程式碼的方式開發,所以速度相對較慢。範例中雖有專門的版面配置方法,但沒有處理螢幕方向變化的情況,因此橫向顯示仍有問題。此外,每個介面都有一個對應的控制類別,在 UIView 類別裡實作 UI 元素的加入與配置,在控制器裡實作事件與邏輯處理,以符合 MVC 的設計模式。
成果展示
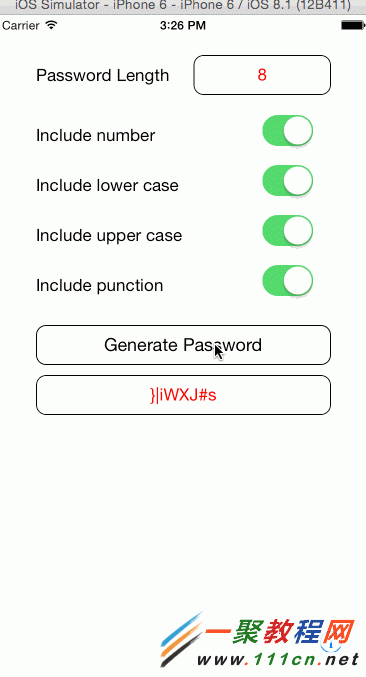
主要技術點
程式主要有兩個介面:主頁面(MainView)與說明頁面(InfomationView),兩者皆以子視圖的方式顯示,且互斥出現。主頁面顯示時,根視圖有一個資訊按鈕,點擊可導向說明頁;而在說明頁時,根視圖頂部有一個導覽列,透過左右按鈕都能返回主頁。
頁面切換的動畫採用 UIView 動畫,基本用法如下:
[UIView beginAnimations:nil context:nil];
[UIView setAnimationDuration:1.0f];
[UIView setAnimationTransition:UIViewAnimationTransitionCurlUp forView:self.view cache:YES];
[self removeMainView];
[UIView commitAnimations];
一個 UINavigationItem 分為三部分:左按鈕、標題文字、右按鈕,主要用法如下:
UINavigationBar* bar = [[UINavigationBar alloc] init];
[self.view insertSubview:bar aboveSubview:self.infomationViewController.view];
UINavigationItem* item = [[UINavigationItem alloc] initWithTitle:@"About Password Generator"];
[bar pushNavigationItem:item animated:YES];
UIBarButtonItem* leftBarButton = [[UIBarButtonItem alloc] initWithTitle:@"Back" style:UIBarButtonItemStylePlain target:self action:@selector(SwitchView)];
UIBarButtonItem* rightBarButton = [[UIBarButtonItem alloc] initWithTitle:@"Done" style:UIBarButtonItemStylePlain target:self action:@selector(SwitchView)];
item.leftBarButtonItem = leftBarButton;
item.rightBarButtonItem = rightBarButton;
由於 UIView 類別在初始化時只加入了控制項,卻沒有進行版面配置,而配置初始化又在類別方法的 reLayout 中,為了確保顯示前能正確呼叫配置,我在視圖對應的控制器類別裡重寫了 viewWillAppear: 方法,在其中呼叫配置方法,如下:
- (void) viewWillAppear:(BOOL)animated
{
if(self.autolayout)
{
[self.view reLayout];
}
[super viewWillAppear:animated];
}
由於經驗不足,原以為輕鬆就能完成的事,動手後卻狀況連連。前一晚寫了一個多小時的程式碼再測試,竟沒有畫面,調整後仍找不出原因;隔天新建工程,邊寫邊看效果,零零散散总算完成了。看來果然不能急於求成,也不能只說不練。
主要程式碼
程式主控制器
//
// ViewController.m
// PasswordGenerator
//
// Created by arbboter on 14/12/23.
// Copyright (c) 2014年 arbboter. All rights reserved.
//
#import "ViewController.h"
#import "MainViewController.h"
#import "InfomationViewController.h"
@interface ViewController ()
@property(nonatomic, retain) UIButton* infomationButton;
@property(nonatomic, retain) MainViewController* mainViewController;
@property(nonatomic, retain) InfomationViewController* infomationViewController;
@property (nonatomic, retain) UINavigationBar* navagationBar;
@end
@implementation ViewController
- (void)viewDidLoad
{
[super viewDidLoad];
// Do any additional setup after loading the view, typically from a nib.
[self SwitchView];
}
- (void) onInfomationView
{
InfomationViewController* viewController = [[InfomationViewController alloc] init];
self.infomationViewController = viewController;
[self.view addSubview:viewController.view];
[viewController release];
UINavigationBar* bar = [[UINavigationBar alloc] init];
[self.view insertSubview:bar aboveSubview:self.infomationViewController.view];
self.navagationBar = bar;
[bar release];
UINavigationItem* item = [[UINavigationItem alloc] initWithTitle:@"About Password Generator"];
[bar pushNavigationItem:item animated:YES];
UIBarButtonItem* leftBarButton = [[UIBarButtonItem alloc] initWithTitle:@"Back" style:UIBarButtonItemStylePlain target:self action:@selector(SwitchView)];
UIBarButtonItem* rightBarButton = [[UIBarButtonItem alloc] initWithTitle:@"Done" style:UIBarButtonItemStylePlain target:self action:@selector(SwitchView)];
item.leftBarButtonItem = leftBarButton;
item.rightBarButtonItem = rightBarButton;
[item release];
[leftBarButton release];
[rightBarButton release];
}
- (void) removeInfomationView
{
[_infomationViewController.view removeFromSuperview];
[_infomationViewController release];
_infomationViewController = nil;
[_navagationBar removeFromSuperview];
[_navagationBar release];
_navagationBar = nil;
}
- (void) SwitchView
{
[UIView beginAnimations:nil context:nil];
[UIView setAnimationDuration:1.0f];
if ([self.infomationButton superview])
{
[UIView setAnimationTransition:UIViewAnimationTransitionCurlUp forView:self.view cache:YES];
[self removeMainView];
[UIView commitAnimations];
[self onInfomationView];
}
else
{
[UIView setAnimationTransition:UIViewAnimationTransitionCurlDown forView:self.view cache:YES];
[self removeInfomationView];
[UIView commitAnimations];
[self onMainView];
}
[self reLayout];
}
- (void) removeMainView
{
[_infomationButton removeFromSuperview];
[_infomationButton release];
_infomationButton = nil;
[_mainViewController.view removeFromSuperview];
[_mainViewController release];
_mainViewController = nil;
}
- (void) onMainView
{
UIButton* button = [UIButton buttonWithType:UIButtonTypeInfoDark];
[self.view addSubview:button];
[button addTarget:self action:@selector(SwitchView) forControlEvents:UIControlEventTouchUpInside];
self.infomationButton = button;
MainViewController* viewController = [[MainViewController alloc] init];
[self.view insertSubview:viewController.view belowSubview:self.infomationButton];
self.mainViewController = viewController;
[viewController release];
}
- (void) reLayout
{
CGPoint origin = self.view.frame.origin;
CGSize size = self.view.frame.size;
CGFloat w = 40;
CGFloat h = 40;
CGFloat yMargin = 10;
CGFloat xMargin = 10;
CGFloat x = origin.x + size.width-2*xMargin-w;
CGFloat y = origin.y + size.height - 2*yMargin - h;
_navagationBar.frame = CGRectMake(origin.x, origin.y+20, size.width, 40);
_infomationButton.frame = CGRectMake(x, y, w, h);
}
-(void) viewWillAppear:(BOOL)animated
{
[self reLayout];
[super viewWillAppear:animated];
}
- (void)didReceiveMemoryWarning
{
[super didReceiveMemoryWarning];
// Dispose of any resources that can be recreated.
}
- (void) dealloc
{
[self removeInfomationView];
[self removeMainView];
[super dealloc];
}
@end
說明頁面視圖類別
//
// InfomationView.m
// PasswordGenerator
//
// Created by arbboter on 14/12/23.
// Copyright (c) 2014年 arbboter. All rights reserved.
//
#import "InfomationView.h"
@interface InfomationView ()
@property (nonatomic, retain) UILabel* logoLabel;
@property (nonatomic, retain) UIImageView* bkImageView;
@end
@implementation InfomationView
- (id)init
{
self = [super init];
if(self == nil)
{
return self;
}
UILabel* label = nil;
label = [[UILabel alloc] init];
label.text = @"Copyright (c) 2014年 arbboter.";
label.textAlignment = NSTextAlignmentCenter;
self.logoLabel = label;
[self addSubview:label];
[label release];
UIImageView* imageView = [[UIImageView alloc] init];
imageView.image = [UIImage imageNamed:@"bk.jpg"];
imageView.contentMode = UIViewContentModeScaleAspectFit;
self.bkImageView = imageView;
[self insertSubview:imageView belowSubview:self.logoLabel];
[imageView release];
return self;
}
- (void) reLayout
{
CGPoint origin = self.frame.origin;
CGSize size = self.frame.size;
CGFloat yMargin = 10;
CGFloat xMargin = 10;
CGFloat w = size.width-2*xMargin;
CGFloat h = 40;
CGFloat x = origin.x + xMargin;
CGFloat y = origin.y + size.height - 2*yMargin - h;
_bkImageView.frame = self.frame;
_logoLabel.frame = CGRectMake(x, y, w, h);
}
- (void) dealloc
{
[_bkImageView release];
[_logoLabel release];
[super dealloc];
}
@end
- 上一篇文章: 蘋果手機丟了怎麼找回?iPhone 被偷後的定位追蹤技巧
- 下一篇文章: 仿網易新聞首頁輪播的 iOS 組件開發實作