
iOS 7 毛玻璃(高斯模糊)效果的實作教學
編輯:iOS 相關教學
iOS 7 大量運用的半透明毛玻璃質感,是當時介面設計最具代表性的特徵。想在自製的圖片上重現這種效果,並不困難,只要借助 Accelerate 框架就能完成。
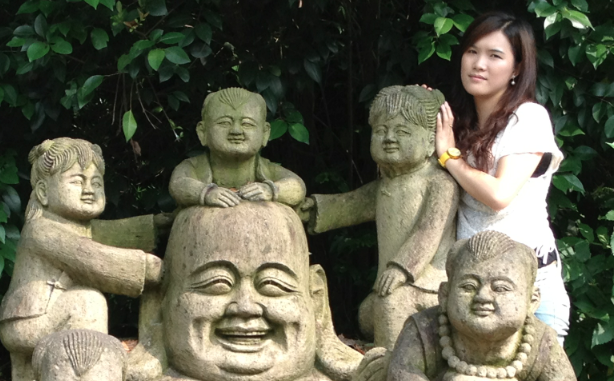
↑ 原圖
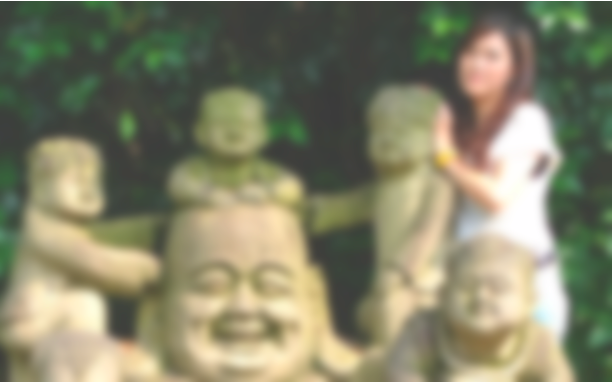
↑ 加上毛玻璃後的效果
準備工作
首先在專案中匯入 Accelerate.framework,接著把下面兩個檔案加入專案即可。
UIImage+ImageEffects.h
#import <UIKit/UIKit.h>

@interface UIImage (ImageEffects)
- (UIImage *)applyLightEffect;
- (UIImage *)applyExtraLightEffect;
- (UIImage *)applyDarkEffect;
- (UIImage *)applyTintEffectWithColor:(UIColor *)tintColor;
- (UIImage *)applyBlurWithRadius:(CGFloat)blurRadius
                       tintColor:(UIColor *)tintColor
           saturationDeltaFactor:(CGFloat)saturationDeltaFactor
                       maskImage:(UIImage *)maskImage;
@end
UIImage+ImageEffects.m
#import "UIImage+ImageEffects.h"
#import <Accelerate/Accelerate.h>
#import <float.h>

@implementation UIImage (ImageEffects)

- (UIImage *)applyLightEffect
{
    UIColor *tintColor = [UIColor colorWithWhite:1.0 alpha:0.3];
    return [self applyBlurWithRadius:30 tintColor:tintColor saturationDeltaFactor:1.8 maskImage:nil];
}

- (UIImage *)applyExtraLightEffect
{
    UIColor *tintColor = [UIColor colorWithWhite:0.97 alpha:0.82];
    return [self applyBlurWithRadius:20 tintColor:tintColor saturationDeltaFactor:1.8 maskImage:nil];
}

- (UIImage *)applyDarkEffect
{
    UIColor *tintColor = [UIColor colorWithWhite:0.11 alpha:0.73];
    return [self applyBlurWithRadius:20 tintColor:tintColor saturationDeltaFactor:1.8 maskImage:nil];
}

- (UIImage *)applyTintEffectWithColor:(UIColor *)tintColor
{
    const CGFloat EffectColorAlpha = 0.6;
    UIColor *effectColor = tintColor;
    int componentCount = CGColorGetNumberOfComponents(tintColor.CGColor);
    if (componentCount == 2) {
        CGFloat b;
        if ([tintColor getWhite:&b alpha:NULL]) {
            effectColor = [UIColor colorWithWhite:b alpha:EffectColorAlpha];
        }
    } else {
        CGFloat r, g, b;
        if ([tintColor getRed:&r green:&g blue:&b alpha:NULL]) {
            effectColor = [UIColor colorWithRed:r green:g blue:b alpha:EffectColorAlpha];
        }
    }
    return [self applyBlurWithRadius:10 tintColor:effectColor saturationDeltaFactor:-1.0 maskImage:nil];
}

- (UIImage *)applyBlurWithRadius:(CGFloat)blurRadius
                       tintColor:(UIColor *)tintColor
           saturationDeltaFactor:(CGFloat)saturationDeltaFactor
                       maskImage:(UIImage *)maskImage
{
    // 前置檢查
    if (self.size.width < 1 || self.size.height < 1) {
        NSLog(@"*** error: invalid size: (%.2f x %.2f). Both dimensions must be >= 1: %@",
              self.size.width, self.size.height, self);
        return nil;
    }
    if (!self.CGImage) {
        NSLog(@"*** error: image must be backed by a CGImage: %@", self);
        return nil;
    }
    if (maskImage && !maskImage.CGImage) {
        NSLog(@"*** error: maskImage must be backed by a CGImage: %@", maskImage);
        return nil;
    }

    CGRect imageRect = { CGPointZero, self.size };
    UIImage *effectImage = self;

    BOOL hasBlur = blurRadius > __FLT_EPSILON__;
    BOOL hasSaturationChange = fabs(saturationDeltaFactor - 1.) > __FLT_EPSILON__;

    if (hasBlur || hasSaturationChange) {
        UIGraphicsBeginImageContextWithOptions(self.size, NO, [[UIScreen mainScreen] scale]);
        CGContextRef effectInContext = UIGraphicsGetCurrentContext();
        CGContextScaleCTM(effectInContext, 1.0, -1.0);
        CGContextTranslateCTM(effectInContext, 0, -self.size.height);
        CGContextDrawImage(effectInContext, imageRect, self.CGImage);

        vImage_Buffer effectInBuffer;
        effectInBuffer.data     = CGBitmapContextGetData(effectInContext);
        effectInBuffer.width    = CGBitmapContextGetWidth(effectInContext);
        effectInBuffer.height   = CGBitmapContextGetHeight(effectInContext);
        effectInBuffer.rowBytes = CGBitmapContextGetBytesPerRow(effectInContext);

        UIGraphicsBeginImageContextWithOptions(self.size, NO, [[UIScreen mainScreen] scale]);
        CGContextRef effectOutContext = UIGraphicsGetCurrentContext();
        vImage_Buffer effectOutBuffer;
        effectOutBuffer.data     = CGBitmapContextGetData(effectOutContext);
        effectOutBuffer.width    = CGBitmapContextGetWidth(effectOutContext);
        effectOutBuffer.height   = CGBitmapContextGetHeight(effectOutContext);
        effectOutBuffer.rowBytes = CGBitmapContextGetBytesPerRow(effectOutContext);

        if (hasBlur) {
            // 以高斯模糊半徑推算 box kernel 寬度,做法參考 SVG 規格:
            // https://www.w3.org/TR/SVG/filters.html#feGaussianBlurElement
            //
            // 當 s >= 2.0 時可用近似法:連續三次 box blur 組成的
            // 分段二次卷積核,與高斯核的誤差約在 3% 以內。
            //
            // 令 d = floor(s * 3 * sqrt(2*pi)/4 + 0.5)
            // 若 d 為奇數,就以 d 為尺寸做三次居中的 box blur
            CGFloat inputRadius = blurRadius * [[UIScreen mainScreen] scale];
            NSUInteger radius = floor(inputRadius * 3. * sqrt(2 * M_PI) / 4 + 0.5);
            if (radius % 2 != 1) {
                radius += 1;  // 強制為奇數,才能套用三次 box blur 的做法
            }
            vImageBoxConvolve_ARGB8888(&effectInBuffer, &effectOutBuffer, NULL, 0, 0,
                                       radius, radius, 0, kvImageEdgeExtend);
            vImageBoxConvolve_ARGB8888(&effectOutBuffer, &effectInBuffer, NULL, 0, 0,
                                       radius, radius, 0, kvImageEdgeExtend);
            vImageBoxConvolve_ARGB8888(&effectInBuffer, &effectOutBuffer, NULL, 0, 0,
                                       radius, radius, 0, kvImageEdgeExtend);
        }

        BOOL effectImageBuffersAreSwapped = NO;
        if (hasSaturationChange) {
            CGFloat s = saturationDeltaFactor;
            CGFloat floatingPointSaturationMatrix[] = {
                0.0722 + 0.9278 * s, 0.0722 - 0.0722 * s, 0.0722 - 0.0722 * s, 0,
                0.7152 - 0.7152 * s, 0.7152 + 0.2848 * s, 0.7152 - 0.7152 * s, 0,
                0.2126 - 0.2126 * s, 0.2126 - 0.2126 * s, 0.2126 + 0.7873 * s, 0,
                0, 0, 0, 1,
            };
            const int32_t divisor = 256;
            NSUInteger matrixSize = sizeof(floatingPointSaturationMatrix) /
                                    sizeof(floatingPointSaturationMatrix[0]);
            int16_t saturationMatrix[matrixSize];
            for (NSUInteger i = 0; i < matrixSize; ++i) {
                saturationMatrix[i] = (int16_t)roundf(floatingPointSaturationMatrix[i] * divisor);
            }
            if (hasBlur) {
                vImageMatrixMultiply_ARGB8888(&effectOutBuffer, &effectInBuffer,
                                              saturationMatrix, divisor, NULL, NULL, kvImageNoFlags);
                effectImageBuffersAreSwapped = YES;
            } else {
                vImageMatrixMultiply_ARGB8888(&effectInBuffer, &effectOutBuffer,
                                              saturationMatrix, divisor, NULL, NULL, kvImageNoFlags);
            }
        }

        if (!effectImageBuffersAreSwapped) {
            effectImage = UIGraphicsGetImageFromCurrentImageContext();
        }
        UIGraphicsEndImageContext();

        if (effectImageBuffersAreSwapped) {
            effectImage = UIGraphicsGetImageFromCurrentImageContext();
        }
        UIGraphicsEndImageContext();
    }

    // 建立輸出的繪圖環境
    UIGraphicsBeginImageContextWithOptions(self.size, NO, [[UIScreen mainScreen] scale]);
    CGContextRef outputContext = UIGraphicsGetCurrentContext();
    CGContextScaleCTM(outputContext, 1.0, -1.0);
    CGContextTranslateCTM(outputContext, 0, -self.size.height);

    // 畫底圖
    CGContextDrawImage(outputContext, imageRect, self.CGImage);

    // 畫模糊後的效果圖
    if (hasBlur) {
        CGContextSaveGState(outputContext);
        if (maskImage) {
            CGContextClipToMask(outputContext, imageRect, maskImage.CGImage);
        }
        CGContextDrawImage(outputContext, imageRect, effectImage.CGImage);
        CGContextRestoreGState(outputContext);
    }

    // 疊上色彩
    if (tintColor) {
        CGContextSaveGState(outputContext);
        CGContextSetFillColorWithColor(outputContext, tintColor.CGColor);
        CGContextFillRect(outputContext, imageRect);
        CGContextRestoreGState(outputContext);
    }

    UIImage *outputImage = UIGraphicsGetImageFromCurrentImageContext();
    UIGraphicsEndImageContext();
    return outputImage;
}

@end
怎麼用?
UIImageView *me = [[UIImageView alloc] initWithFrame:CGRectMake(10, 480, 614, 381)];
[me setImage:[[UIImage imageNamed:@"me.png"]
      applyBlurWithRadius:5
                tintColor:[UIColor colorWithWhite:1 alpha:0.2]
    saturationDeltaFactor:1.8
                maskImage:nil]];
[self.view addSubview:me];
原理小結
整個流程可以拆成三步:先用 vImageBoxConvolve_ARGB8888 做三次 box blur 逼近高斯模糊,再用 vImageMatrixMultiply_ARGB8888 調整飽和度,最後把模糊圖、遮罩與色調合成輸出。之所以動用 Accelerate 而非 Core Image,是因為它純 CPU 運算、不依賴 GPU 上下文,適合處理已經在記憶體中的靜態圖片。如果是要對畫面即時的視覺效果下手,則更建議改用 UIVisualEffectView。
- 上一篇文章: iOS 中判斷指定路徑檔案是否存在的多種做法
- 下一篇文章: 用 CAReplicatorLayer 模擬音量振動條