
iOS 專案檔案結構透視與 MVC 分層的逐步優化實踐
一、認清專案裡的每個資料夾
新建一個 Xcode 專案,左側檔案樹看起來琳瑯滿目,但真正需要天天打交道的其實只有幾個。
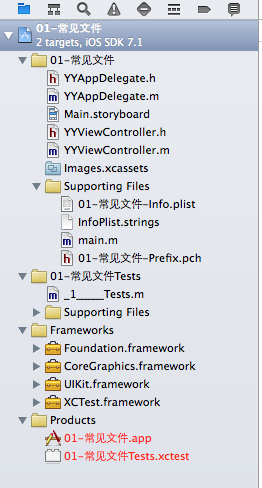
products:Mac 平台的可執行產物,iOS 開發用不到。
frameworks:存放依賴的框架。
test:單元測試相關檔案。
專案名稱資料夾:我們真正要寫程式碼的地方。
1. Info.plist —— 應用運作期的設定檔
這是工程執行期最重要的設定檔,刪不得。舊版 Xcode 建立專案時,這個檔案就叫 info.plist,所以自己準備 plist 時千萬別取這個名字,會撞車。
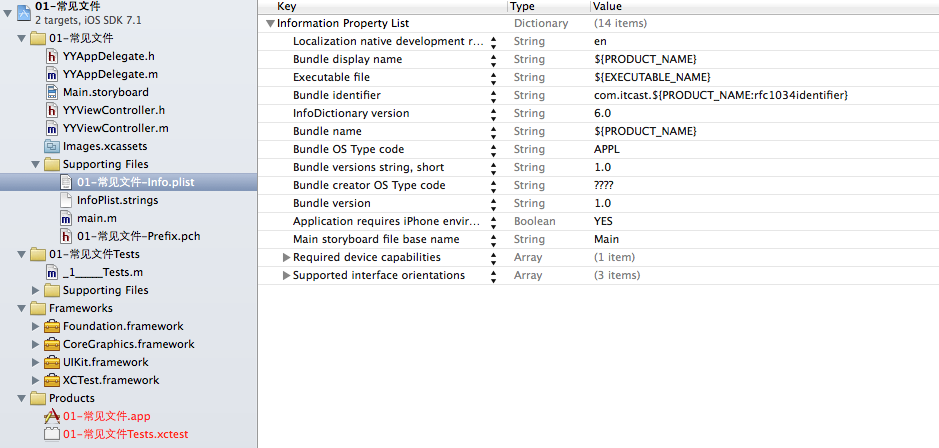
幾個關鍵欄位:
Bundle display name:應用顯示名稱。想改桌面上顯示的名稱,改這裡就對了。改完建議先刪掉模擬器上的舊 App 並清理專案,因為系統有快取。
Bundle identifier:唯一標識符。慣例是把網域倒過來寫,保證全域唯一。
Bundle versions string, short 與 bundle version:前者是對外發布的正式版本號,後者是內部建置版本號。上架時,新的 build 號必須比舊的大。
Main storyboard file base name:指定主要的 storyboard。
修改方式有兩種:直接在下圖的屬性清單裡改,或者點選專案 target,透過視覺化介面設定。
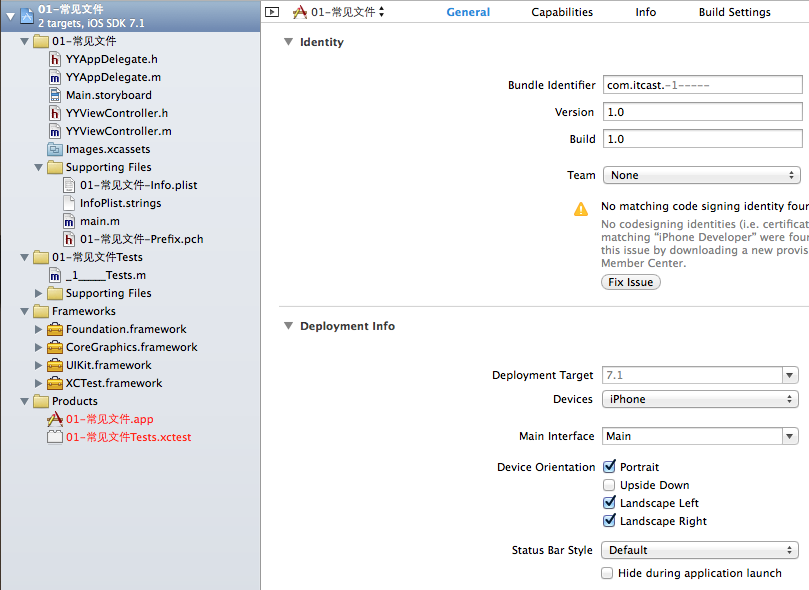
另外兩點補充:支援的旋轉方向最多三個(系統不允許同時支援顛倒);plist 本質上是 XML,以鍵值對保存資料,標籤帶 CF 前綴。
2. pch —— 全域預先編譯標頭
放在這裡的內容會被專案內所有原始檔共享,通常用來放巨集定義與全域都會用到的標頭檔。
典型的三種用途:定義全域巨集、匯入全域標頭、以及自訂 NSLog。
第三點值得細說。開發分兩個階段:除錯階段需要 log 幫忙定位問題,系統會自動定義 DEBUG 巨集;發布階段則不需要 log,因為它耗資源,而且使用者看不懂。
那難道每次發布都要手動把 NSLog 一個個註解掉,下一版再一個個打開?顯然不合理。在 pch 裡自訂一個日誌巨集,用條件編譯自動切換,這個問題就解決了。
// __OBJC__這個宏,在所有的.m和.mm文件中默認就定義了這個宏
#ifdef __OBJC__
// 如果這個全局的頭文件或者宏只需要在.m或者.mm文件中使用,
// 請把該頭文件或宏寫到#ifdef __OBJC__ 中
#import <UIKit/UIKit.h>
#import <Foundation/Foundation.h>
#ifdef DEBUG
#define NJLog(...) NSLog(__VA_ARGS__)
#else
#define NJLog(...)
#endif
#endif
這裡的省略號代表接收可變參數。__OBJC__ 這個巨集在 .m 與 .mm 檔中預設就存在,所以包在 #ifdef __OBJC__ 裡的內容只會在 Objective-C 原始檔中編譯。建議把這類全域宣告都放進條件編譯區塊,並注意補上 #endif。
至於 InfoPlist.strings,它與 Info.plist 的本地化有關。
二、從一次次優化中理解 MVC
需求
做一個九宮格 App 展示頁,點擊某個圖示後提示「下載成功」。
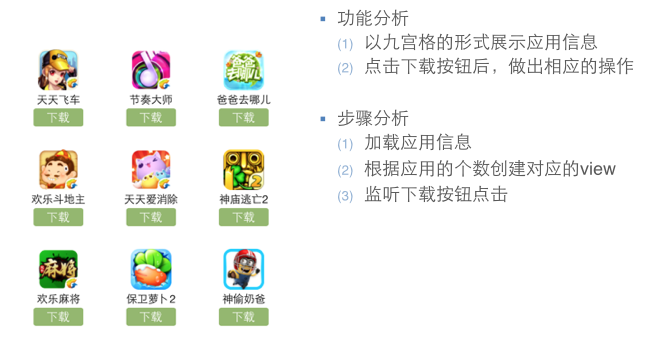
第一版:能跑就好
這版用了字典轉模型和 xib 連線,功能完整。
檔案結構:
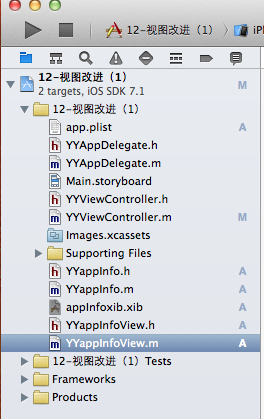
模型 YYappInfo.h:
#import <Foundation/Foundation.h>
@interface YYappInfo : NSObject
@property(nonatomic,copy)NSString *name;
@property(nonatomic,copy)NSString *icon;
@property(nonatomic,strong,readonly)UIImage *img;
-(instancetype)initWithDict:(NSDictionary *)dict;
/**工廠方法*/
+(instancetype)appInfoWithDict:(NSDictionary *)dict;
@end
YYappInfo.m:
#import "YYappInfo.h"
@interface YYappInfo()
{
UIImage *_img;
}
@end
@implementation YYappInfo
-(instancetype)initWithDict:(NSDictionary *)dict
{
if (self=[super init]) {
self.name=dict[@"name"];
self.icon=dict[@"icon"];
}
return self;
}
+(instancetype)appInfoWithDict:(NSDictionary *)dict
{
return [[self alloc]initWithDict:dict];
}
-(UIImage *)img
{
_img=[UIImage imageNamed:self.icon];
return _img;
}
@end
xib 對應的 view 類 YYappInfoView.h(三個屬性皆已連線):
#import <UIKit/UIKit.h>
@interface YYappInfoView : UIView
@property (strong, nonatomic) IBOutlet UIImageView *appInfoViewimg;
@property (strong ,nonatomic) IBOutlet UILabel *appInfoViewlab;
@property (strong, nonatomic) IBOutlet UIButton *appInfoViewbtn;
@end
主控制器 YYViewController.m:
#import "YYViewController.h"
#import "YYappInfo.h"
#import "YYappInfoView.h"
@interface YYViewController ()
@property(nonatomic,strong)NSArray *apps;
@end
//開發思路
//1.加載plist文件(字典轉模型提供接口)
//2.使用xib文件完成單個的view
//3.計算坐標,使用for循環把view展現到界面上
//4.優化代碼
@implementation YYViewController
//get方法,懶加載
-(NSArray *)apps
{
if (!_apps) {
NSString *path = [[NSBundle mainBundle]pathForResource:@"app.plist" ofType:nil];
NSArray *arrayM = [NSArray arrayWithContentsOfFile:path];
NSMutableArray *appinfoarray=[NSMutableArray array];
for (NSDictionary *dict in arrayM) {
[appinfoarray addObject:[YYappInfo appInfoWithDict:dict]];
}
_apps = appinfoarray;
}
return _apps;
}
- (void)viewDidLoad
{
[super viewDidLoad];
NSLog(@"%d",self.apps.count);
int totalloc = 3;
CGFloat appviewW = 80;
CGFloat appviewH = 90;
CGFloat margin = (self.view.frame.size.width-totalloc*appviewW)/(totalloc+1);
int count=self.apps.count;
for (int i = 0; i < count; i++) {
int row = i/totalloc;
int loc = i%totalloc;
CGFloat appviewX = margin + (margin + appviewW) * loc;
CGFloat appviewY = margin + (margin + appviewH) * row;
YYappInfo *appinfo=self.apps[i];
//拿出xib中的數據
NSArray *arryM=[[NSBundle mainBundle]loadNibNamed:@"appInfoxib" owner:nil options:nil];
YYappInfoView *appinfoview=[arryM firstObject];
//設置位置
appinfoview.frame=CGRectMake(appviewX, appviewY, appviewW, appviewH);
//設置值
appinfoview.appInfoViewimg.image=appinfo.img;
appinfoview.appInfoViewlab.text=appinfo.name;
//添加到視圖
appinfoview.appInfoViewbtn.tag=i;
[appinfoview.appInfoViewbtn addTarget:self action:@selector(Click:) forControlEvents:UIControlEventTouchUpInside];
[self.view addSubview:appinfoview];
}
}
-(void)Click:(UIButton *)btn
{
btn.enabled=NO;
YYappInfo *appinfo=self.apps[btn.tag];
UILabel *lab=[[UILabel alloc]initWithFrame:CGRectMake(60, 450, 200, 20)];
[lab setBackgroundColor:[UIColor lightGrayColor]];
[lab setTextAlignment:NSTextAlignmentCenter];
[lab setText:[NSString stringWithFormat:@"%@成功下載",appinfo.name]];
[self.view addSubview:lab];
lab.alpha=1.0;
[UIView animateWithDuration:2.0 animations:^{
lab.alpha=0;
}completion:^(BOOL finished) {
[lab removeFromSuperview];
}];
}
@end
第二版:把呈現邏輯搬進 view
先捫心自問三個問題:
1)主控制器裡對控制項屬性的賦值,能不能搬到 view 內部?
2)從 xib 讀取物件的程式碼,跟主控制器其實沒什麼關係,能不能一起封裝?
3)上面兩步做完後,剩下的按鈕事件放在主控制器裡就很突兀了,是不是該一起搬走?
答案是都可以。view 對外只提供一個資料入口,其餘自己消化。
YYappInfoView.h:
#import <UIKit/UIKit.h>
@class YYappInfo;
@interface YYappInfoView : UIView
//只對外開放一個數據接口
+(instancetype)appInfoViewWithappInfo:(YYappInfo *)appinfo;
@end
YYappInfoView.m(屬性與 Click 均已連線):
#import "YYappInfoView.h"
#import "YYappInfo.h"
//私有擴展,把屬性拿進來
@interface YYappInfoView ()
@property (strong, nonatomic) IBOutlet UIImageView *appInfoViewimg;
@property (strong ,nonatomic) IBOutlet UILabel *appInfoViewlab;
@property (strong, nonatomic) IBOutlet UIButton *appInfoViewbtn;
@property(strong,nonatomic)YYappInfo *appinfo;
@end
@implementation YYappInfoView
+(instancetype)appInfoView
{
NSArray *arryM=[[NSBundle mainBundle]loadNibNamed:@"appInfoxib" owner:nil options:nil];
YYappInfoView *appinfoview=[arryM firstObject];
return appinfoview;
}
+(instancetype)appInfoViewWithappInfo:(YYappInfo *)appinfo
{
YYappInfoView *appInfoView=[self appInfoView];
appInfoView.appinfo=appinfo;
return appInfoView;
}
-(void)setAppinfo:(YYappInfo *)appinfoc
{
//這裡一定要記錄變化
_appinfo=appinfoc;
self.appInfoViewimg.image=appinfoc.img;
self.appInfoViewlab.text=appinfoc.name;
}
- (IBAction)Click {
self.appInfoViewbtn.enabled=NO;
YYappInfo *appinfo=self.appinfo;
UILabel *lab=[[UILabel alloc]initWithFrame:CGRectMake(60, 450, 200, 20)];
[lab setBackgroundColor:[UIColor lightGrayColor]];
[lab setTextAlignment:NSTextAlignmentCenter];
[lab setText:[NSString stringWithFormat:@"%@成功下載",appinfo.name]];
//把lab添加到父視圖
[self.superview addSubview:lab];
lab.alpha=1.0;
[UIView animateWithDuration:2.0 animations:^{
lab.alpha=0;
}completion:^(BOOL finished) {
[lab removeFromSuperview];
}];
}
@end
主控制器隨之變輕:
#import "YYViewController.h"
#import "YYappInfo.h"
#import "YYappInfoView.h"
@interface YYViewController ()
@property(nonatomic,strong)NSArray *apps;
@end
@implementation YYViewController
-(NSArray *)apps
{
if (!_apps) {
NSString *path = [[NSBundle mainBundle]pathForResource:@"app.plist" ofType:nil];
NSArray *arrayM = [NSArray arrayWithContentsOfFile:path];
NSMutableArray *appinfoarray=[NSMutableArray array];
for (NSDictionary *dict in arrayM) {
[appinfoarray addObject:[YYappInfo appInfoWithDict:dict]];
}
_apps = appinfoarray;
}
return _apps;
}
- (void)viewDidLoad
{
[super viewDidLoad];
int totalloc = 3;
CGFloat appviewW = 80;
CGFloat appviewH = 90;
CGFloat margin = (self.view.frame.size.width-totalloc*appviewW)/(totalloc+1);
int count=self.apps.count;
for (int i = 0; i < count; i++) {
int row = i/totalloc;
int loc = i%totalloc;
CGFloat appviewX = margin + (margin + appviewW) * loc;
CGFloat appviewY = margin + (margin + appviewH) * row;
//要達到的效果 appinfoview.appinfo=self.apps[i]
YYappInfo *appinfo=self.apps[i];
YYappInfoView *appinfoview=[YYappInfoView appInfoViewWithappInfo:appinfo];
//設置位置
appinfoview.frame=CGRectMake(appviewX, appviewY, appviewW, appviewH);
//添加
[self.view addSubview:appinfoview];
}
}
@end
第三版:把資料處理搬進 model
還有什麼能改?主控制器裡那段讀 plist、迴圈轉模型的程式碼,本質上是資料層的事,放進模型更合適。
YYappInfo.h 多開一個類方法:
#import <Foundation/Foundation.h>
@interface YYappInfo : NSObject
@property(nonatomic,copy)NSString *name;
@property(nonatomic,copy)NSString *icon;
@property(nonatomic,strong)UIImage *img;
-(instancetype)initWithDict:(NSDictionary *)dict;
/**工廠方法*/
+(instancetype)appInfoWithDict:(NSDictionary *)dict;
+(NSArray *)appinfoarray;
@end
YYappInfo.m:
#import "YYappInfo.h"
@interface YYappInfo()
@end
@implementation YYappInfo
-(instancetype)initWithDict:(NSDictionary *)dict
{
if (self=[super init]) {
self.name=dict[@"name"];
self.icon=dict[@"icon"];
}
return self;
}
+(instancetype)appInfoWithDict:(NSDictionary *)dict
{
return [[self alloc]initWithDict:dict];
}
-(UIImage *)img
{
_img=[UIImage imageNamed:self.icon];
return _img;
}
//把數據處理部分拿到模型中來處理
+(NSArray *)appinfoarray
{
NSString *path = [[NSBundle mainBundle]pathForResource:@"app.plist" ofType:nil];
NSArray *arrayM = [NSArray arrayWithContentsOfFile:path];
NSMutableArray *appinfoarray=[NSMutableArray array];
for (NSDictionary *dict in arrayM) {
[appinfoarray addObject:[YYappInfo appInfoWithDict:dict]];
}
return appinfoarray;
}
@end
主控制器終於回歸它該做的事——協調模型與視圖:
#import "YYViewController.h"
#import "YYappInfo.h"
#import "YYappInfoView.h"
@interface YYViewController ()
@property(nonatomic,strong)NSArray *apps;
@end
@implementation YYViewController
-(NSArray *)apps
{
if (!_apps) {
_apps=[YYappInfo appinfoarray];
}
return _apps;
}
- (void)viewDidLoad
{
[super viewDidLoad];
int totalloc = 3;
CGFloat appviewW = 80;
CGFloat appviewH = 90;
CGFloat margin = (self.view.frame.size.width-totalloc*appviewW)/(totalloc+1);
int count=self.apps.count;
for (int i = 0; i < count; i++) {
int row = i/totalloc;
int loc = i%totalloc;
CGFloat appviewX = margin + (margin + appviewW) * loc;
CGFloat appviewY = margin + (margin + appviewH) * row;
YYappInfo *appinfo=self.apps[i];
YYappInfoView *appinfoview=[YYappInfoView appInfoViewWithappInfo:appinfo];
appinfoview.frame=CGRectMake(appviewX, appviewY, appviewW, appviewH);
[self.view addSubview:appinfoview];
}
}
@end
最終效果:

View 封裝的兩條通用準則
(1)當一個 view 內部子控制項較多時,就該自訂一個 view,把內部建立過程隱藏起來,不讓外界操心。
(2)外界把模型資料傳給 view,由 view 自己分發給內部子控制項。
三、MVC 機制要點
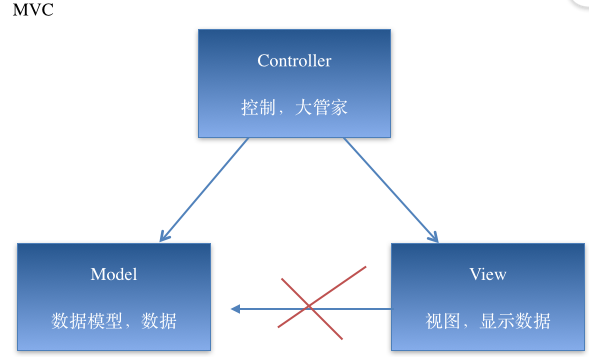
(1)控制器的程式碼量應該保持輕薄,不該操心的不要操心,協調好模型與視圖即可,要學會當一個好主管。
(2)三方各司其職:模型只負責資料處理,視圖只負責把拿到的資料呈現出來,兩者都是被動的,等控制器調遣。
(3)反過來說,如果視圖直接持有模型、雙方私下就有資料通道,那控制器還有存在的意義嗎?分層也就形同虛設了。
回頭看這三版程式碼:功能一行沒變,但每一版都把某類職責從控制器搬到了它更該待的地方。這就是重構的節奏——不是一次吃五個包子,而是一步一步把架構吃透。