
用 SDAutoLayout 實作 UITableViewCell 自適應高度(附完整程式碼)
編輯:iOS 相關教學
讓 cell 高度依內容自動撐開,是聊天、留言、動態流這類列表的共同需求。手算高度既麻手又容易出錯,好在社群已有成熟方案。本文以 SDAutoLayout 為例,走一遍完整流程。
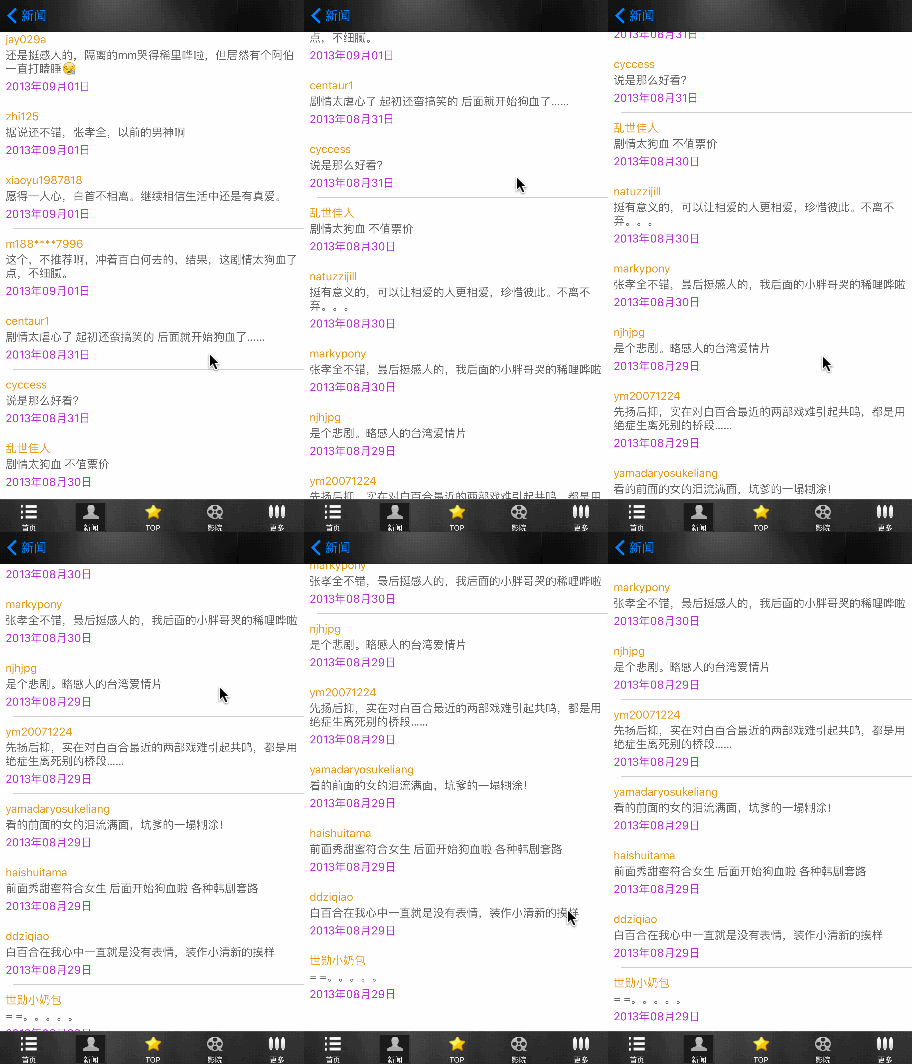
專案下載:https://github.com/gsdios/SDAutoLayout
一、Model 層
資料用 JSONModel 對應,一筆留言包含內容、暱稱與時間。
// commentsModel.h
#import "JSONModel.h"
#import "getCommentData.h"

@interface commentsModel : JSONModel
@property (nonatomic, copy) NSArray<getCommentData> *commentList;
@end

// commentsModel.m
#import "commentsModel.h"
@implementation commentsModel
@end

// getCommentData.h
#import "JSONModel.h"

@protocol getCommentData
@end

@interface getCommentData : JSONModel
@property (nonatomic, copy) NSString *message;
@property (nonatomic, copy) NSString *nickName;
@property (nonatomic, copy) NSString *createTimeStr;
@end

// getCommentData.m
#import "getCommentData.h"
@implementation getCommentData
@end
二、控制器
重點是 heightForRowAtIndexPath: 不再回傳固定值,而是交由 cell 依配置計算。
#import "commentsTableViewController.h"
#import "commentsModel.h"
#import "commentCell.h"

@interface commentsTableViewController ()
@property (nonatomic, strong) NSArray *commentsArray;
@end

@implementation commentsTableViewController

// 延遲載入本地 JSON
-(NSArray *)commentsArray {
    if (_commentsArray == nil) {
        NSData *data = [NSData dataWithContentsOfFile:[[NSBundle mainBundle] pathForResource:@"comment_list.json" ofType:nil]];
        commentsModel *commensM = [[commentsModel alloc] initWithData:data error:nil];
        _commentsArray = commensM.commentList;
    }
    return _commentsArray;
}

- (void)viewDidLoad {
    [super viewDidLoad];
}

- (NSInteger)numberOfSectionsInTableView:(UITableView *)tableView {
    return 1;
}

- (NSInteger)tableView:(UITableView *)tableView numberOfRowsInSection:(NSInteger)section {
    return self.commentsArray.count;
}

- (UITableViewCell *)tableView:(UITableView *)tableView cellForRowAtIndexPath:(NSIndexPath *)indexPath {
    static NSString *ID = @"comment";
    commentCell *cell = [tableView dequeueReusableCellWithIdentifier:ID];
    if (cell == nil) {
        cell = [[commentCell alloc] initWithStyle:UITableViewCellStyleDefault reuseIdentifier:ID];
    }
    cell.commentData = self.commentsArray[indexPath.row];
    return cell;
}

// 高度交給 cell 依內容寬度自行計算
-(CGFloat)tableView:(UITableView *)tableView heightForRowAtIndexPath:(NSIndexPath *)indexPath {
    return [self cellHeightForIndexPath:indexPath cellContentViewWidth:[self cellContentViewWith]];
}

-(CGFloat)cellContentViewWith {
    CGFloat width = [UIScreen mainScreen].bounds.size.width;
    // 舊系統下橫螢幕要取另一個邊
    if ([UIApplication sharedApplication].statusBarOrientation != UIInterfaceOrientationPortrait
        && [[UIDevice currentDevice].systemVersion floatValue] < 8) {
        width = [UIScreen mainScreen].bounds.size.height;
    }
    return width;
}

@end
三、自訂 Cell
關鍵在最後一行 setupAutoHeightWithBottomViewsArray:bottomMargin:,只要告訴它「哪些視圖是最底部的」以及「底部要留多少間距」,其餘交給框架。
#import <UIKit/UIKit.h>

@class getCommentData;

@interface commentCell : UITableViewCell
@property (nonatomic, strong) getCommentData *commentData;
@property (nonatomic, strong) UILabel *nameLabel;
@property (nonatomic, strong) UILabel *titleLabel;
@property (nonatomic, strong) UILabel *dateLabel;
@end

#import "commentCell.h"
#import "commentsModel.h"

@implementation commentCell

-(void)setCommentData:(getCommentData *)commentData {
    _commentData = commentData;
    _titleLabel.text = commentData.message;
    _dateLabel.text = commentData.createTimeStr;
    _nameLabel.text = commentData.nickName;
}

- (instancetype)initWithStyle:(UITableViewCellStyle)style reuseIdentifier:(NSString *)reuseIdentifier {
    self = [super initWithStyle:style reuseIdentifier:reuseIdentifier];
    if (self) {
        [self setup];
    }
    return self;
}

-(void)setup {
    CGFloat margin = 10;
    UIView *contentView = self.contentView;

    _nameLabel = [UILabel new];
    [contentView addSubview:_nameLabel];
    _nameLabel.textColor = [UIColor colorWithRed:0.891 green:0.549 blue:0.073 alpha:1.000];
    _nameLabel.font = [UIFont systemFontOfSize:15];
    _nameLabel.numberOfLines = 1;

    // 留言內容允許多行
    _titleLabel = [UILabel new];
    [contentView addSubview:_titleLabel];
    _titleLabel.textColor = [UIColor darkGrayColor];
    _titleLabel.font = [UIFont systemFontOfSize:15];
    _titleLabel.numberOfLines = 0;

    _dateLabel = [UILabel new];
    [contentView addSubview:_dateLabel];
    _dateLabel.textColor = [UIColor colorWithRed:0.679 green:0.166 blue:0.828 alpha:1.000];
    _dateLabel.font = [UIFont systemFontOfSize:15];
    _dateLabel.numberOfLines = 1;

    _nameLabel.sd_layout
        .leftSpaceToView(contentView, margin)
        .topSpaceToView(contentView, margin)
        .rightSpaceToView(contentView, margin)
        .heightIs(20);

    _titleLabel.sd_layout
        .leftSpaceToView(contentView, margin)
        .topSpaceToView(_nameLabel, 2)
        .rightSpaceToView(contentView, margin)
        .autoHeightRatio(0);   // 高度依內容自動撐開

    _dateLabel.sd_layout
        .leftSpaceToView(contentView, margin)
        .topSpaceToView(_titleLabel, 5)
        .heightIs(20)
        .widthIs(150);

    // 指定最底部視圖與底部間距,cell 高度由此回推
    [self setupAutoHeightWithBottomViewsArray:@[_titleLabel, _dateLabel, _nameLabel] bottomMargin:margin];
}

@end
如果不想引入第三方框架,iOS 8 之後也可以直接用 Auto Layout 搭配 UITableViewAutomaticDimension 的 estimatedRowHeight 達成同樣效果,程式碼量更少。
- 上一篇文章: UIScrollView 詳解:屬性、Delegate 與縮放機制一次搞懂
- 下一篇文章: iOS 限制輸入表情符號:用正則表達式即時過濾