
iOS 為圖片加上文字浮水印的實作解析
編輯:iOS 相關教學
直接看程式碼最快。這裡的做法是幫 UIImage 開一個分類,用繪圖上下文把文字畫到原圖上,再取回合成後的圖片。
在 .h 中宣告
+ (UIImage *)imageWithimage:(UIImage *)image content:(NSString *)content frame:(CGRect)frame;
.m 的實作
 + (UIImage *)imageWithimage:(UIImage *)image content:(NSString *)content frame:(CGRect)frame {
    // 開啟圖形上下文
    UIGraphicsBeginImageContextWithOptions(image.size, NO, 0);

    // 先畫上原圖
    [image drawAtPoint:CGPointZero];

    // 再疊上文字
    NSString *str = content;

    // 文字屬性字典
    NSDictionary *dictionary = @{
        NSForegroundColorAttributeName : [UIColor blackColor],
        NSFontAttributeName : [UIFont systemFontOfSize:20]
    };

    [str drawInRect:frame withAttributes:dictionary];

    // 從目前上下文取出合成後的圖片
    UIImage *imageNew = UIGraphicsGetImageFromCurrentImageContext();

    // 關閉上下文
    UIGraphicsEndImageContext();

    return imageNew;
}
這裡要注意版本差異:drawInRect:withAttributes: 是 iOS 7.0 之後才有的 API。如果你的專案還要支援更早的系統,記得先判斷,或改用舊的 drawInRect:withFont: 系列。
 double device = [[UIDevice currentDevice].systemVersion doubleValue];
if (device >= 7.0f) {
    // do something
}
在 ViewController 中使用
 // 傳入原圖、文字內容與文字顯示範圍
UIImage *image = [UIImage imageWithimage:[UIImage imageNamed:@"3"] content:@"伊利丹" frame:CGRectMake(20, 500, 100, 100)];

UIImageView *imageView = [[UIImageView alloc] initWithFrame:CGRectMake(0, 0, kScreenWidth, kScreenHeight)];
imageView.image = image;
[self.view addSubview:imageView];
效果如下圖,簡單就完成了在圖片上加水印:
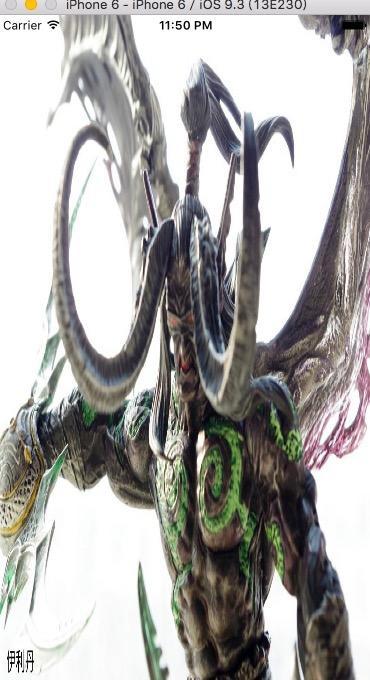
想調整文字大小或顏色,直接改方法裡那個屬性字典即可;更通用的做法是把字典抽成參數傳進來,讓呼叫端自行決定樣式。
另外提醒兩點:一是 UIGraphicsBeginImageContextWithOptions 的第三個參數傳 0 代表使用螢幕的預設 scale,在 Retina 螢幕上能保留清晰度,傳 1 則會明顯變糊;二是若浮水印會疊在多張圖上,建議把繪製邏輯抽到獨立的工具類別,並考慮提供多行文字與透明度參數,避免每個呼叫點都重複寫一次屬性字典。
以上就是 iOS 為圖片加上文字浮水印的完整做法,希望對大家開發有所幫助。
- 上一篇文章: iOS 圖片壓縮詳解:「壓」與「縮」是兩件不同的事
- 下一篇文章: 釐清 iOS 中 nil、Nil、NULL 與 NSNull 的差別