
iOS 練習專案:實作微信朋友圈與搖搖功能
編輯:iOS 相關教學
這是一個練手用的 Side Project,目的是熟悉目前主流 App 的架構方式。專案採 MVC 設計模式,以純程式碼為主、少量 XIB 輔助,主要完成兩件事:朋友圈式動態列表,以及搖一搖互動。
預覽效果:
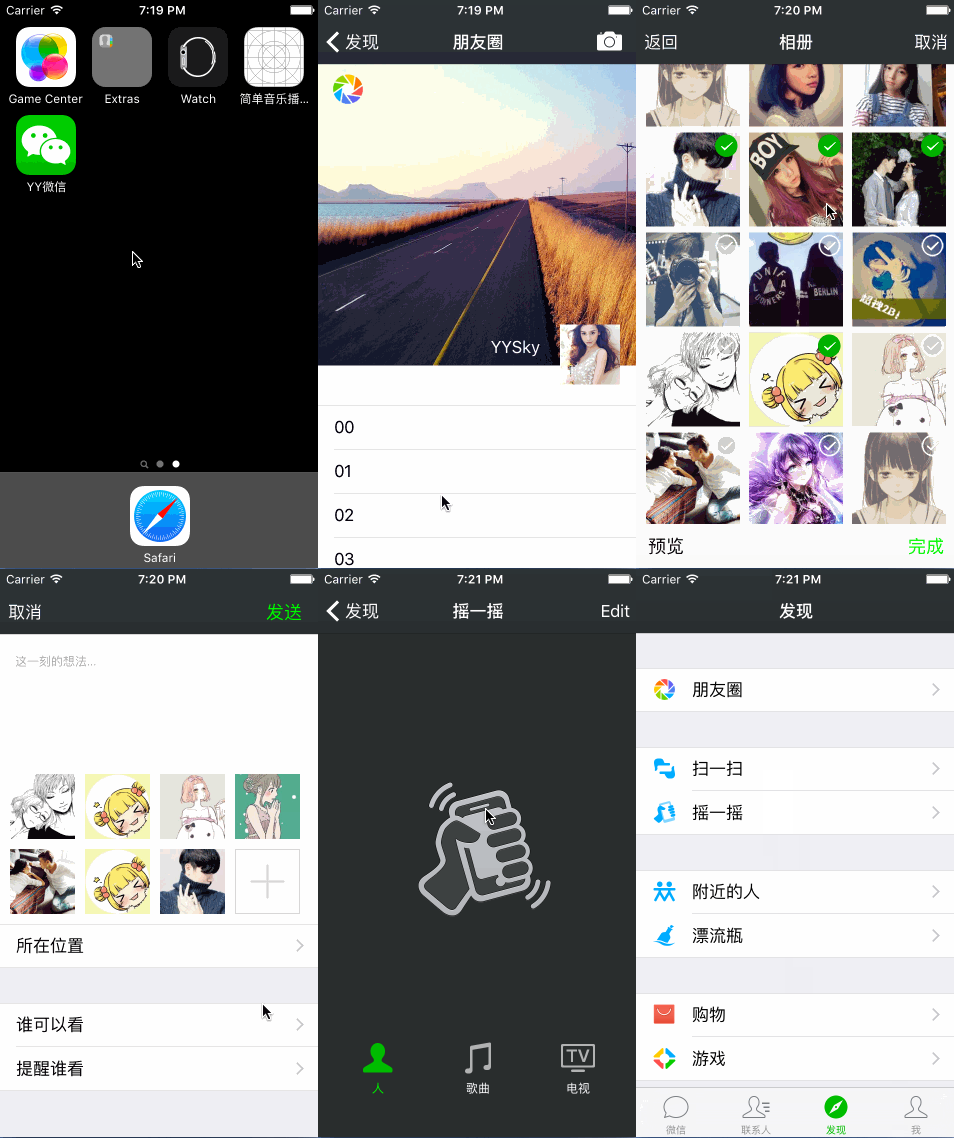
重點一:整體架構
以 UITabBarController 搭配 UINavigationController 完成。這裡的心得是要定義合適的基底類別,方便統一管理外觀,例如導覽列的背景、標題顏色與渲染方式,以及底部標籤列的樣式。
 [self.navigationBar setBackgroundImage:[UIImage imageNamed:@"Dimensional-_Code_Bg"] forBarMetrics:UIBarMetricsDefault];
[self.navigationBar setTitleTextAttributes:@{ NSForegroundColorAttributeName : [UIColor whiteColor] }];
[self.navigationBar setTintColor:[UIColor whiteColor]];
重點二:發現頁與我的頁
這兩頁用 UITableViewController 加上 Plist 檔驅動,部分地方導入資料模型,部分直接讀字典,實作難度不高。
 - (instancetype)initWithDict:(NSDictionary *)dict {
    if (self = [super init]) {
        [self setValuesForKeysWithDictionary:dict];
    }
    return self;
}

+ (instancetype)pictureWithDict:(NSDictionary *)dict {
    return [[self alloc] initWithDict:dict];
}
重點三:朋友圈功能
這部分的難點有三個:首頁的下拉動畫、選圖頁的狀態重用,以及圖片在頁面之間的傳遞與代理設計。
下拉動畫主要靠 transform 搭配 scrollView 的多種滾動狀態位階來完成:
 - (void)scrollViewWillBeginDragging:(UIScrollView *)scrollView {
    self.dragging = YES;
}

- (void)scrollViewDidScroll:(UIScrollView *)scrollView {
    if (self.num == 0) {
        self.num ++;
        return;
    }

    CGFloat offsetY = scrollView.contentOffset.y;
    CGFloat angle = -offsetY * M_PI / 30;

    if (self.dragging == YES) {
        if (offsetY <= 110) {
            self.containerView.y = 10 + offsetY;
        }
    } else {
        if (self.currentY < 120) {
            self.containerView.y = 10 + offsetY;
        }
    }

    self.activityView.transform = CGAffineTransformMakeRotation(angle);
}

- (void)scrollViewDidEndDragging:(UIScrollView *)scrollView willDecelerate:(BOOL)decelerate {
    self.dragging = NO;
    CGFloat currentY = self.containerView.y;
    self.currentY = currentY;
}

- (void)scrollViewDidEndDecelerating:(UIScrollView *)scrollView {
    [UIView animateWithDuration:0.25 animations:^{
        self.containerView.frame = CGRectMake(15, 120, 30, 30);
        self.activityView.transform = CGAffineTransformMakeRotation(2 * M_PI);
    }];
}
照片選擇頁是用 UICollectionViewController 自刻的,沒有直接叫起系統相簿,因此難度提高不少。自訂 cell 之後,用代理在類別之間傳遞狀態:
 @protocol YYPictureCellDelegate

@optional
- (void)pictureCell:(YYPictureCell *)cell withDidClickBtn:(UIButton *)btn;

@end

- (IBAction)clickSureBtn:(UIButton *)sender {
    if ([self.delegate respondsToSelector:@selector(pictureCell:withDidClickBtn:)]) {
        [self.delegate pictureCell:self withDidClickBtn:sender];
    }
}

- (void)pictureCell:(YYPictureCell *)cell withDidClickBtn:(UIButton *)btn {
    // 微信限制最多九張
    if ((self.selectedBtn.count == 9) && (!btn.isSelected)) {
        UIAlertView *alert = [[UIAlertView alloc] initWithTitle:nil
                                                  message:@"最多選取 9 張照片喔!"
                                                  delegate:nil
                                               cancelButtonTitle:@"確定"
                                               otherButtonTitles:nil, nil];
        [alert show];
        return;
    }

    btn.selected = !btn.isSelected;
    NSIndexPath *indexPath = [self.collectionView indexPathForCell:cell];
    YYPictureModel *model = self.dataArray[indexPath.row];

    if (btn.isSelected) {
        model.clickedBtn = YES;
        [self.selectedBtn addObject:btn];
        [self.selImageArray addObject:model];
    } else {
        model.clickedBtn = NO;
        [self.selectedBtn removeObject:btn];
        [self.selImageArray removeObject:model];
    }

    // 沒有選任何照片時,底部按鈕應為不可用狀態
    if (self.selectedBtn.count > 0) {
        self.doneBtn.enabled = YES;
        self.doneBtn.selected = YES;
        self.previewBtn.enabled = YES;
        self.previewBtn.selected = YES;
    } else {
        self.doneBtn.enabled = NO;
        self.doneBtn.selected = NO;
        self.previewBtn.enabled = NO;
        self.previewBtn.selected = NO;
    }
}
重點四:搖一搖功能
搖一搖本身很簡單,只要實作系統的兩個 motion 方法。真正的功夫在動畫:上下兩張圖片要對向移動、線條跟著進出,最後再彈出搜尋框。這裡的 frame 計算稍微繁瑣,特別是線條與圖片要同步移動時,容易出現對不齊的情況。
 // 實作搖一搖
- (void)motionBegan:(UIEventSubtype)motion withEvent:(UIEvent *)event {
    self.upLine.hidden = NO;
    self.downLine.hidden = NO;

    [UIView animateWithDuration:0.6 animations:^{
        // 先向外分開
        self.upImageView.y -= 60;
        self.upLine.y -= 60;
        self.downImageView.y += 60;
        self.downLine.y += 60;
    } completion:^(BOOL finished) {
        // 再收回原位
        [UIView animateWithDuration:0.6 animations:^{
            self.upImageView.y += 60;
        self.upLine.y += 60;
        self.downImageView.y -= 60;
        self.downLine.y -= 60;
       } completion:^(BOOL finished) {
            self.upLine.hidden = YES;
            self.downLine.hidden = YES;

            // 彈出搜尋框
            [self showSearchView];
            [self.searchView performSelector:@selector(removeFromSuperview) withObject:nil afterDelay:2.4];
        }];
    }];
}

// 搖一搖結束
- (void)motionEnded:(UIEventSubtype)motion withEvent:(UIEvent *)event {
}
要補充的是,搖一搖偵測需要在真機上測試,模擬器無法觸發 motion 事件。另外若要在多個頁面都支援,記得把 becomeFirstResponder 與相關狀態管理處理好,否則容易出現某頁搖了沒反應的情形。
以上就是這個練習專案的全部內容,希望對大家的學習有所幫助。
- 上一篇文章: iOS 10 來襲:值得升級的 10 款開發工具
- 下一篇文章: iOS Runtime 使用總結:從訊息機制到方法交換