
iOS 展開三級列表效果示例
效果圖如下:
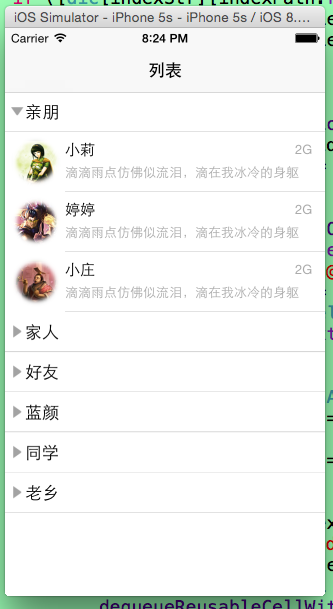
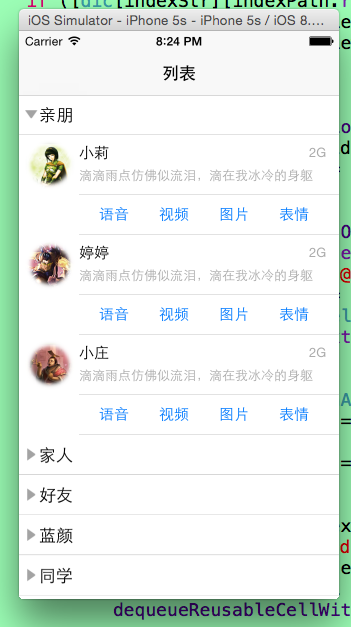
整體結構是:一個 section 對應一級分類(表頭),展開後出現二級列(MainCell),點二級列再插入一組三級列(AttachedCell,內含語音/視頻/圖片/表情四個按鈕)。狀態分別用 selectedArr(一級展開)與每筆資料的 state 欄位(二級展開)記錄。
AppDelegate
#import <UIKit/UIKit.h>

@interface AppDelegate : UIResponder <UIApplicationDelegate>
@property (strong, nonatomic) UIWindow *window;
@end
#import "AppDelegate.h"
#import "RootViewController.h"

@implementation AppDelegate

- (BOOL)application:(UIApplication *)application
didFinishLaunchingWithOptions:(NSDictionary *)launchOptions {
    self.window = [[UIWindow alloc] initWithFrame:[[UIScreen mainScreen] bounds]];
    self.window.backgroundColor = [UIColor whiteColor];

    RootViewController *root = [[RootViewController alloc] init];
    UINavigationController *navi = [[UINavigationController alloc] initWithRootViewController:root];
    self.window.rootViewController = navi;
    [self.window makeKeyAndVisible];
    return YES;
}

@end
RootViewController
#import "RootViewController.h"
#import "MainCell.h"
#import "DetialTableViewCell.h"

@interface RootViewController () <UITableViewDataSource, UITableViewDelegate>
{
    UITableView *_tableView;
    NSMutableDictionary *dic;        // 各 section 對應的資料
    NSMutableArray *selectedArr;     // 一級列表是否展開
    NSMutableArray *titleDataArray;  // 一級標題
}
@end

@implementation RootViewController

- (void)viewDidLoad {
    [super viewDidLoad];
    self.title = @"列表";

    dic = [[NSMutableDictionary alloc] init];
    selectedArr = [[NSMutableArray alloc] init];
    titleDataArray = [[NSMutableArray alloc] initWithObjects:
        @"親朋", @"家人", @"好友", @"藍顏", @"同學", @"老鄉", nil];

    _tableView = [[UITableView alloc] initWithFrame:CGRectMake(0, 0,
                     320 * scaleX, [UIScreen mainScreen].bounds.size.height)
                                            style:UITableViewStylePlain];
    _tableView.delegate = self;
    _tableView.dataSource = self;
    _tableView.showsVerticalScrollIndicator = NO;
    _tableView.showsHorizontalScrollIndicator = NO;
    _tableView.separatorStyle = UITableViewCellSeparatorStyleNone;
    [self.view addSubview:_tableView];

    [self loadData];
}
建立資料
這裡用一個小工具方法產生二級資料,避免為每個 group 重複寫十幾行 dictionary:
- (NSMutableDictionary *)itemWithName:(NSString *)name {
    return [NSMutableDictionary dictionaryWithObjectsAndKeys:
        @"MainCell", @"cell",
        name,        @"name",
        @"NO",       @"state", nil];
}

- (void)loadData {
    NSMutableArray *groupArr[6];

    groupArr[0] = [[NSMutableArray alloc] initWithObjects:
        [self itemWithName:@"小莉"], [self itemWithName:@"婷婷"], [self itemWithName:@"小莊"], nil];
    groupArr[1] = [[NSMutableArray alloc] initWithObjects:
        [self itemWithName:@"晨晨姐"], [self itemWithName:@"李濤"],
        [self itemWithName:@"海波"], [self itemWithName:@"張敏"], nil];
    groupArr[2] = [[NSMutableArray alloc] initWithObjects:
        [self itemWithName:@"楊浩"], [self itemWithName:@"小明"], [self itemWithName:@"洋洋"],
        [self itemWithName:@"趙蒙"], [self itemWithName:@"小催"], [self itemWithName:@"和平"], nil];
    groupArr[3] = [[NSMutableArray alloc] initWithObjects:
        [self itemWithName:@"超人"], [self itemWithName:@"怪獸"], nil];
    groupArr[4] = [[NSMutableArray alloc] initWithObjects:
        [self itemWithName:@"大包"], [self itemWithName:@"小林子"], [self itemWithName:@"石頭"],
        [self itemWithName:@"小軒軒"], [self itemWithName:@"阿東"], nil];
    groupArr[5] = [[NSMutableArray alloc] initWithObjects:
        [self itemWithName:@"鄭平"], [self itemWithName:@"劉凡"], [self itemWithName:@"韓琴"],
        [self itemWithName:@"劉華健"], [self itemWithName:@"彭曉明"],
        [self itemWithName:@"張歡"], [self itemWithName:@"劉來楠"], [self itemWithName:@"任強"], nil];

    for (NSInteger i = 0; i < 6; i++) {
        [dic setValue:groupArr[i] forKey:[NSString stringWithFormat:@"%ld", (long)i]];
    }
}
一級:section 與表頭
#pragma mark - tableView delegate

- (NSInteger)numberOfSectionsInTableView:(UITableView *)tableView {
    return titleDataArray.count;
}

- (NSInteger)tableView:(UITableView *)tableView numberOfRowsInSection:(NSInteger)section {
    NSString *string = [NSString stringWithFormat:@"%d", (int)section];
    // 只有展開的 section 才有 row
    if ([selectedArr containsObject:string]) {
        return [dic[string] count];
    }
    return 0;
}

- (CGFloat)tableView:(UITableView *)tableView heightForHeaderInSection:(NSInteger)section {
    return 40 * scaleX;
}

- (CGFloat)tableView:(UITableView *)tableView heightForFooterInSection:(NSInteger)section {
    return 0.2;
}

- (UIView *)tableView:(UITableView *)tableView viewForHeaderInSection:(NSInteger)section {
    UIView *view = [[UIView alloc] initWithFrame:CGRectMake(0, 0, 320 * scaleX, 30 * scaleY)];
    view.backgroundColor = [UIColor whiteColor];

    UILabel *titleLabel = [[UILabel alloc] initWithFrame:CGRectMake(20 * scaleX, 5 * scaleY,
        tableView.frame.size.width - 20 * scaleX, 30 * scaleY)];
    titleLabel.text = titleDataArray[section];
    [view addSubview:titleLabel];

    UIImageView *imageView = [[UIImageView alloc] initWithFrame:
        CGRectMake(5 * scaleX, 12 * scaleY, 15 * scaleX, 15 * scaleY)];
    imageView.tag = 20000 + section;
    NSString *string = [NSString stringWithFormat:@"%d", (int)section];
    imageView.image = [UIImage imageNamed:
        [selectedArr containsObject:string] ? @"buddy_header_arrow_down"
                                            : @"buddy_header_arrow_right"];
    [view addSubview:imageView];

    UIButton *button = [UIButton buttonWithType:UIButtonTypeCustom];
    button.frame = CGRectMake(0, 0, 320 * scaleX, 40 * scaleY);
    button.tag = 100 + section;
    [button addTarget:self action:@selector(buttonAction:) forControlEvents:UIControlEventTouchUpInside];
    [view addSubview:button];

    UIImageView *lineImage = [[UIImageView alloc] initWithFrame:
        CGRectMake(0, 40 * scaleY - 1, 320 * scaleX, 1)];
    lineImage.image = [UIImage imageNamed:@"line"];
    [view addSubview:lineImage];

    return view;
}

// 點表頭:切換一級展開狀態
- (void)buttonAction:(UIButton *)sender {
    NSString *string = [NSString stringWithFormat:@"%d", (int)(sender.tag - 100)];
    if ([selectedArr containsObject:string]) {
        [selectedArr removeObject:string];
    } else {
        [selectedArr addObject:string];
    }
    [_tableView reloadData];
}
二級與三級列
- (CGFloat)tableView:(UITableView *)tableView heightForRowAtIndexPath:(NSIndexPath *)indexPath {
    NSString *indexStr = [NSString stringWithFormat:@"%d", (int)indexPath.section];
    if ([dic[indexStr][indexPath.row][@"cell"] isEqualToString:@"MainCell"]) {
        return 60 * scaleY;
    }
    return 40 * scaleY;
}

- (UITableViewCell *)tableView:(UITableView *)tableView cellForRowAtIndexPath:(NSIndexPath *)indexPath {
    NSString *indexStr = [NSString stringWithFormat:@"%d", (int)indexPath.section];

    if ([dic[indexStr][indexPath.row][@"cell"] isEqualToString:@"MainCell"]) {
        static NSString *identifier = @"MainCell";
        MainCell *cell = [tableView dequeueReusableCellWithIdentifier:identifier];
        if (cell == nil) {
            cell = [[MainCell alloc] initWithStyle:UITableViewCellStyleDefault
                                 reuseIdentifier:identifier];
            cell.selectionStyle = UITableViewCellSelectionStyleGray;
        }
        cell.Headerphoto.image = [UIImage imageNamed:
            [NSString stringWithFormat:@"%d.png", arc4random() % 11]];
        cell.nameLabel.text = dic[indexStr][indexPath.row][@"name"];
        cell.IntroductionLabel.text = @"滴滴雨點仿佛似流淚,滴在我冰冷的身軀";
        cell.networkLabel.text = @"2G";
        return cell;
    }

    if ([dic[indexStr][indexPath.row][@"cell"] isEqualToString:@"AttachedCell"]) {
        static NSString *detialIdentifier = @"AttachedCell";
        DetialTableViewCell *cell = [tableView dequeueReusableCellWithIdentifier:detialIdentifier];
        if (cell == nil) {
            cell = [[DetialTableViewCell alloc] initWithStyle:UITableViewCellStyleDefault
                                            reuseIdentifier:detialIdentifier];
            cell.selectionStyle = UITableViewCellSelectionStyleNone;
            cell.imageLine.image = [UIImage imageNamed:@"line"];
        }
        return cell;
    }
    return nil;
}

// 點二級列:插入或移除三級列
- (void)tableView:(UITableView *)tableView didSelectRowAtIndexPath:(NSIndexPath *)indexPath {
    [_tableView deselectRowAtIndexPath:indexPath animated:YES];

    NSString *indexStr = [NSString stringWithFormat:@"%d", (int)indexPath.section];
    NSMutableArray *group = dic[indexStr];

    // 點的是 MainCell 時,三級列會插在下一行
    BOOL isMain = [group[indexPath.row][@"cell"] isEqualToString:@"MainCell"];
    NSInteger targetRow = isMain ? indexPath.row + 1 : indexPath.row;
    NSIndexPath *path = [NSIndexPath indexPathForItem:targetRow inSection:indexPath.section];

    NSMutableDictionary *mainItem = group[isMain ? indexPath.row : indexPath.row - 1];
    NSString *name = mainItem[@"name"];
    BOOL isOpening = ![mainItem[@"state"] boolValue];

    mainItem[@"state"] = isOpening ? @"YES" : @"NO";

    [_tableView beginUpdates];
    if (isOpening) {
        [group insertObject:[NSMutableDictionary dictionaryWithObjectsAndKeys:
            @"AttachedCell", @"cell", @"YES", @"state", nil]
                    atIndex:path.row];
        [_tableView insertRowsAtIndexPaths:@[path]
                       withRowAnimation:UITableViewRowAnimationMiddle];
    } else {
        [group[path.row - 1] setObject:@"NO" forKey:@"state"];
        [group removeObjectAtIndex:path.row];
        [_tableView deleteRowsAtIndexPaths:@[path]
                       withRowAnimation:UITableViewRowAnimationMiddle];
    }
    [_tableView endUpdates];
}

- (void)didReceiveMemoryWarning {
    [super didReceiveMemoryWarning];
}
@end
這裡把原本六段幾乎一模一樣的 switch (indexPath.section) 收斂成「先取得該 section 的 group,再對 group 操作」的寫法,行為完全相同但少了大量重複程式碼,也避免新增 section 時漏改某一個 case。
MainCell(二級列)
#import "MainCell.h"

@implementation MainCell

- (id)initWithStyle:(UITableViewCellStyle)style reuseIdentifier:(NSString *)reuseIdentifier {
    self = [super initWithStyle:style reuseIdentifier:reuseIdentifier];
    if (self) {
        // 頭像
        _Headerphoto = [[UIImageView alloc] initWithFrame:
            CGRectMake(6 * scaleX, 5 * scaleY, 50 * scaleX, 50 * scaleX)];
        [self.contentView addSubview:_Headerphoto];

        // 名字
        _nameLabel = [[UILabel alloc] initWithFrame:
            CGRectMake(60 * scaleX, 5 * scaleY, 200 * scaleX, 25 * scaleX)];
        _nameLabel.font = [UIFont systemFontOfSize:15];
        [self.contentView addSubview:_nameLabel];

        // 簡介
        _IntroductionLabel = [[UILabel alloc] initWithFrame:
            CGRectMake(60 * scaleX, 28 * scaleY, 240 * scaleX, 25 * scaleX)];
        _IntroductionLabel.backgroundColor = [UIColor clearColor];
        _IntroductionLabel.textColor = [UIColor lightGrayColor];
        _IntroductionLabel.font = [UIFont systemFontOfSize:13];
        [self.contentView addSubview:_IntroductionLabel];

        // 網路狀態
        _networkLabel = [[UILabel alloc] initWithFrame:
            CGRectMake(290 * scaleX, 5 * scaleY, 50 * scaleX, 25 * scaleY)];
        _networkLabel.backgroundColor = [UIColor clearColor];
        _networkLabel.textColor = [UIColor lightGrayColor];
        _networkLabel.font = [UIFont systemFontOfSize:13];
        [self.contentView addSubview:_networkLabel];

        // 分隔線
        _imageLine = [[UIImageView alloc] initWithFrame:
            CGRectMake(60 * scaleX, 60 * scaleY - 1, (320 - 60) * scaleX, 1)];
        [self.contentView addSubview:_imageLine];
    }
    return self;
}
@end
DetialTableViewCell(三級列)
#import "DetialTableViewCell.h"
#import "UIButton+initializer.h"

@implementation DetialTableViewCell

- (id)initWithStyle:(UITableViewCellStyle)style reuseIdentifier:(NSString *)reuseIdentifier {
    self = [super initWithStyle:style reuseIdentifier:reuseIdentifier];
    if (self) {
        _imageLine = [[UIImageView alloc] initWithFrame:
            CGRectMake(60 * scaleX, 40 * scaleY - 1, (320 - 60) * scaleY, 1)];
        [self.contentView addSubview:_imageLine];

        NSArray *titles = @[@"語音", @"視頻", @"圖片", @"表情"];
        for (NSInteger i = 0; i < titles.count; i++) {
            UIButton *btn = [UIButton initButtonWithFrame:
                CGRectMake((70 + i * 60) * scaleX, 9 * scaleY, 50 * scaleX, 20 * scaleY)
                                           Title:titles[i]
                                          Target:self
                                        Selector:@selector(btnAction:)];
            btn.tag = 100 + i * 100;
            [self.contentView addSubview:btn];
        }
    }
    return self;
}

- (void)btnAction:(UIButton *)sender {
    switch (sender.tag) {
        case 100: NSLog(@"~~~~語音~~~~"); break;
        case 200: NSLog(@"~~~~視頻~~~~"); break;
        case 300: NSLog(@"~~~~圖片~~~~"); break;
        case 400: NSLog(@"~~~~表情~~~~"); break;
        default: break;
    }
}
@end
UIButton 的分類(快速初始化)
+ (UIButton *)initButtonWithFrame:(CGRect)frame
                           Target:(id)target
                         Selector:(SEL)selector
                            Image:(NSString *)image
                     ImagePressed:(NSString *)imagePressed {
    UIButton *button = [UIButton buttonWithType:UIButtonTypeCustom];
    button.frame = frame;
    [button setBackgroundImage:[UIImage imageNamed:image] forState:0];
    [button setBackgroundImage:[UIImage imageNamed:imagePressed]
                     forState:UIControlStateHighlighted];
    [button addTarget:target action:selector forControlEvents:UIControlEventTouchUpInside];
    return button;
}

+ (UIButton *)initButtonWithFrame:(CGRect)frame
                           Title:(NSString *)title
                         Target:(id)target
                       Selector:(SEL)selector {
    UIButton *button = [UIButton buttonWithType:UIButtonTypeRoundedRect];
    button.frame = frame;
    [button setTitle:title forState:0];
    [button addTarget:target action:selector forControlEvents:UIControlEventTouchUpInside];
    return button;
}
pch 檔
#ifndef QQList_PrefixHeader_pch
#define QQList_PrefixHeader_pch

#define scaleX [UIScreen mainScreen].bounds.size.width / 320.0
#define scaleY [UIScreen mainScreen].bounds.size.height / 568.0

#endif
幾點實務提醒
1. 三級列表最常見的 bug 是 indexPath 錯位。建議一律「先改資料、再依新的資料位置呼叫 insert/delete」,並把 beginUpdates/endUpdates 包住,這麼做能避開大部分內部索引不一致的例外。
2. scaleX / scaleY 這種依螢幕比例縮放的寫法在新尺寸裝置上會讓元素變形。若重寫,建議改用 Auto Layout 或至少以寬度比例為主、高度用固定值。
3. 展開狀態若需要跨頁面保留,應把 state 存進模型並在資料來源統一處理,而不是散落在多個平行陣列裡(原寫法用 groupArr0~groupArr5 六個陣列,就是後者,維護成本高)。
以上就是 iOS 展開三級列表效果的完整示例,希望對大家開發有幫助。