
iOS 筆記:自製「記住密碼」勾選按鈕
編輯:iOS 相關教學
登入頁面幾乎都會有「記住密碼」這種需求。系統沒有現成的 checkbox 控制項,實務上常見做法是自訂一個 UIControl 子類別,把勾選框與文字包在同一個可點擊區域裡。以下分享 BECheckBox 的整體使用方式,供大家參考。
一、效果圖
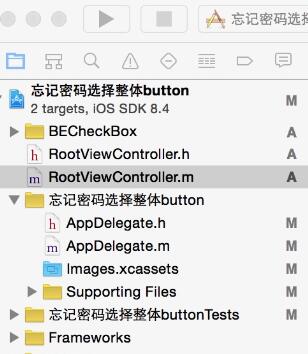
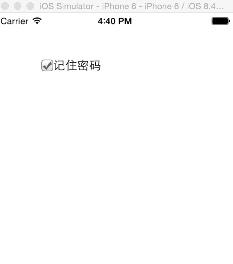
二、工程結構
三、程式碼
RootViewController.h
#import <UIKit/UIKit.h>

@class BECheckBox;

@interface RootViewController : UIViewController {
    BECheckBox *passwordCheck;
}

@property(nonatomic, retain) BECheckBox *passwordCheck;

@end
RootViewController.m
#import "RootViewController.h"
// 匯入自訂的勾選框
#import "BECheckBox.h"

@interface RootViewController ()
@end

@implementation RootViewController

@synthesize passwordCheck;

- (id)initWithNibName:(NSString *)nibNameOrNil bundle:(NSBundle *)nibBundleOrNil {
    self = [super initWithNibName:nibNameOrNil bundle:nibBundleOrNil];
    if (self) {
        // Custom initialization
    }
    return self;
}

- (void)viewDidLoad {
    [super viewDidLoad];

    // 隱藏導覽列
    self.navigationController.navigationBarHidden = YES;

    // 建立「記住密碼」勾選框
    BECheckBox *passCheckBox = [[BECheckBox alloc] initWithFrame:CGRectMake(61, 55, 80, 30)];
    [passCheckBox setTitle:@"記住密碼" forState:UIControlStateNormal];
    [passCheckBox setTitleColor:[UIColor blackColor] forState:UIControlStateNormal];
    passCheckBox.titleLabel.font = [UIFont systemFontOfSize:16];
    [passCheckBox setTarget:self fun:@selector(passCheckBoxClick)];
    passCheckBox.backgroundColor = [UIColor clearColor];

    self.passwordCheck = passCheckBox;
    [self.view addSubview:self.passwordCheck];
}

// 點擊「記住密碼」
- (void)passCheckBoxClick {
    if ([self.passwordCheck isChecked]) {
        NSLog(@"記住密碼");
    } else {
        NSLog(@"取消記住密碼");
    }
}

- (void)didReceiveMemoryWarning {
    [super didReceiveMemoryWarning];
    // Dispose of any resources that can be recreated.
}

@end
幾個實作上的提醒:勾選框的點擊範圍最好涵蓋文字,長度依文案調整;狀態切換除了換圖,也可以只改 tintColor;如果放在 Cell 裡重用,記得在 prepareForReuse 重設勾選狀態,避免外觀與資料不同步。以上就是這次分享的全部內容,希望對大家有幫助。
- 上一篇文章: Swift 共享檔案操作整理(iOS 8 以上)
- 下一篇文章: 在 App 內開啟 App Store 應用詳情頁的優化思路