
iOS 實作筆記:打造類似電子書閱讀器的書架頁面
編輯:iOS 相關教學
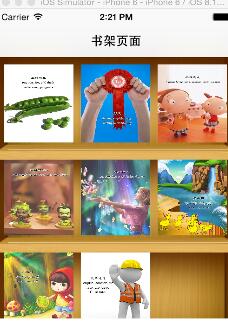
電子書 App 的首頁通常就是一個書架,用格子排列一本本書。本文整理了自己動手做書架頁面的完整過程,重點在於自訂 UITableViewCell,並在每一列裡放進三個按鈕來承載封面圖,最後把點擊事件往上拋給控制器處理。程式碼僅供參考,可依自己的專案結構調整。
一、成品預覽
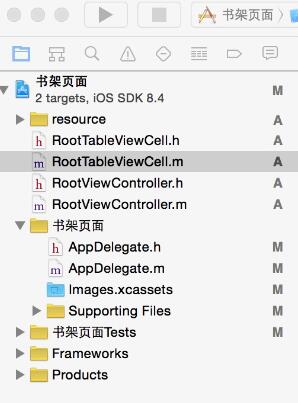
二、專案結構
三、控制器程式碼
RootViewController.h
 #import <UIKit/UIKit.h>

@interface RootViewController : UIViewController <UITableViewDataSource, UITableViewDelegate> {
    NSMutableArray *dataArray;
    UITableView *myTableView;
}

@end
RootViewController.m
 #import "RootViewController.h"

// 自訂 cell
#import "RootTableViewCell.h"

@interface RootViewController ()
@end

@implementation RootViewController

- (id)initWithNibName:(NSString *)nibNameOrNil bundle:(NSBundle *)nibBundleOrNil {
    self = [super initWithNibName:nibNameOrNil bundle:nibBundleOrNil];
    if (self) {
        // Custom initialization
    }
    return self;
}

- (void)viewDidLoad {
    [super viewDidLoad];
    // Do any additional setup after loading the view.
    // 初始化背景與列表
    [self initBackGroundView];
}

#pragma mark - functions

-(void)initBackGroundView {
    self.title = @"書架頁面";

    // 用來對應書封圖檔名的資料來源
    dataArray = [[NSMutableArray alloc] initWithObjects:@"1", @"2", @"3", @"4", @"5", @"6", @"7", @"8", @"9", nil];

    myTableView = [[UITableView alloc] initWithFrame:CGRectMake(0, 0, 320, 416) style:UITableViewStylePlain];
    myTableView.delegate = self;
    myTableView.dataSource = self;
    [self.view addSubview:myTableView];
}

#pragma mark - UITableViewDelegate

-(NSInteger)tableView:(UITableView *)tableView numberOfRowsInSection:(NSInteger)section {
    // 一列放三本書,九本書剛好三列
    return 3;
}

-(CGFloat)tableView:(UITableView *)tableView heightForRowAtIndexPath:(NSIndexPath *)indexPath {
    return 376 / 3;
}

-(UITableViewCell *)tableView:(UITableView *)tableView cellForRowAtIndexPath:(NSIndexPath *)indexPath {
    RootTableViewCell *cell = [tableView dequeueReusableCellWithIdentifier:@"ID"];
    if (cell == nil) {
        cell = [[RootTableViewCell alloc] initWithStyle:UITableViewCellStyleValue1 reuseIdentifier:@"ID"];
    }
    cell.tag = indexPath.row;

    // 綁定三個書封按鈕的點擊事件
    [cell.bookLeft addTarget:self action:@selector(buttonClick:) forControlEvents:UIControlEventTouchUpInside];
    [cell.bookMiddle addTarget:self action:@selector(buttonClick:) forControlEvents:UIControlEventTouchUpInside];
    [cell.bookRight addTarget:self action:@selector(buttonClick:) forControlEvents:UIControlEventTouchUpInside];

    // 依序設定左中右三本書的封面
    [cell.bookLeft setBackgroundImage:[UIImage imageNamed:[NSString stringWithFormat:@"%@.jpg", [dataArray objectAtIndex:indexPath.row * 3]]] forState:UIControlStateNormal];
    [cell.bookMiddle setBackgroundImage:[UIImage imageNamed:[NSString stringWithFormat:@"%@.jpg", [dataArray objectAtIndex:indexPath.row * 3 + 1]]] forState:UIControlStateNormal];
    [cell.bookRight setBackgroundImage:[UIImage imageNamed:[NSString stringWithFormat:@"%@.jpg", [dataArray objectAtIndex:indexPath.row * 3 + 2]]] forState:UIControlStateNormal];

    NSLog(@"--cell.tag--%ld", (long)cell.tag);
    return cell;
}

#pragma mark - doClickActions

-(void)buttonClick:(UIButton *)btn {
    // 由按鈕一路往上找到所屬的 cell
    RootTableViewCell *cell = (RootTableViewCell *)[[btn superview] superview];
    NSIndexPath *path = [myTableView indexPathForCell:cell];
    NSLog(@"--點擊書封時,所在座標-(%ld,%ld)--", (long)path.row, (long)btn.tag);
}

- (void)didReceiveMemoryWarning {
    [super didReceiveMemoryWarning];
    // Dispose of any resources that can be recreated.
}

@end
四、自訂 Cell
RootTableViewCell.h
 #import <UIKit/UIKit.h>

@interface RootTableViewCell : UITableViewCell

@property (nonatomic, strong) UIButton *bookLeft;
@property (nonatomic, strong) UIButton *bookMiddle;
@property (nonatomic, strong) UIButton *bookRight;

@end
RootTableViewCell.m
 #import "RootTableViewCell.h"

@implementation RootTableViewCell

@synthesize bookLeft;
@synthesize bookMiddle;
@synthesize bookRight;

- (id)initWithStyle:(UITableViewCellStyle)style reuseIdentifier:(NSString *)reuseIdentifier {
    self = [super initWithStyle:style reuseIdentifier:reuseIdentifier];
    if (self) {
        // 每列的底圖,模擬木質層板
        UIImageView *imageView = [[UIImageView alloc] initWithFrame:CGRectMake(0, 0, 320, 416 / 3)];
        imageView.image = [UIImage imageNamed:@"BookShelfCell.png"];
        [self addSubview:imageView];

        // 左
        bookLeft = [UIButton buttonWithType:UIButtonTypeCustom];
        bookLeft.frame = CGRectMake(10, 10, 280 / 3, 376 / 3 - 20);
        bookLeft.tag = 1;

        // 中
        bookMiddle = [UIButton buttonWithType:UIButtonTypeCustom];
        bookMiddle.frame = CGRectMake(20 + 280 / 3, 10, 280 / 3, 376 / 3 - 20);
        bookMiddle.tag = 2;

        // 右
        bookRight = [UIButton buttonWithType:UIButtonTypeCustom];
        bookRight.frame = CGRectMake(30 + 280 / 3 * 2, 10, 280 / 3, 376 / 3 - 20);
        bookRight.tag = 3;

        [self addSubview:bookLeft];
        [self addSubview:bookMiddle];
        [self addSubview:bookRight];
    }
    return self;
}

@end
五、延伸閱讀
如果你還想進一步了解書架布局的排版細節,可以搭配《iOS 模仿電子書首頁實現書架布局樣式》一起看,兩篇互補之後,對於「一列多格」這類排列會更有概念。
以上就是本文的全部內容,希望對大家的學習有所幫助。