iOS開發之微信聊天工具欄的封裝
微信大家基本上都用過,今天要做的就是微信的聊天工具條。聊天工具條還是比較復雜的,其中包括發送表情,發送文字,發送圖片,發送聲音,拍照等等功能,下面給出發送錄音,文字,表情的代碼,其他的和這幾樣類似。還是那句話百字不如一圖,先來幾張效果圖吧。
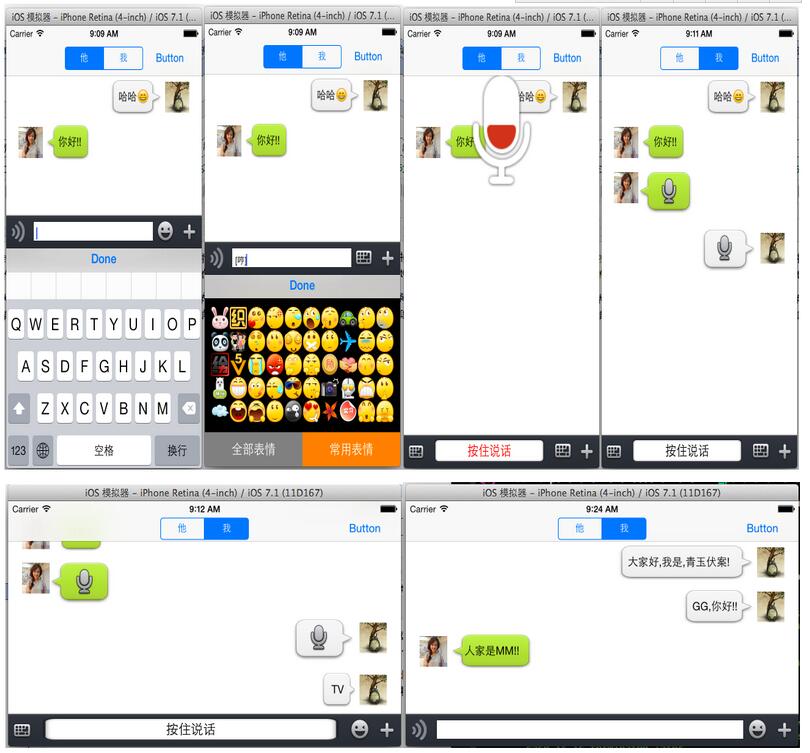
在封裝聊天工具條的的時候表情鍵盤是之前封裝好的,所以拿過來就可以用的啦。因為不管是工具條還是表情鍵盤都是用約束來控件大小的,所以橫屏也是沒問題的,在大屏手機上也是沒問題的。下面將會一步步講解如何封裝下面的聊天工具條。主要是對工具條的封裝,表情鍵盤在這就不做講解了。
一、ToolView預留的接口
在封裝ToolView中主要用到Block回調,讀者可以根據自己的個人習慣來選擇是Block回調,還是委托回調或者是目標動作回調(筆者更喜歡Block回調),下面的代碼是ToolView給調用者提供的接口
//
// ToolView.h
// MecroMessage
//
// Created by (青玉伏案)on 14-9-22.
// Copyright (c) 2014年 Mrli. All rights reserved.
//

#import <UIKit/UIKit.h>


//定義block類型把ToolView中TextView中的文字傳入到Controller中
typedef void (^MyTextBlock) (NSString *myText);

//錄音時的音量
typedef void (^AudioVolumeBlock) (CGFloat volume);

//錄音存儲地址
typedef void (^AudioURLBlock) (NSURL *audioURL);

//改變根據文字改變TextView的高度
typedef void (^ContentSizeBlock)(CGSize contentSize);

//錄音取消的回調
typedef void (^CancelRecordBlock)(int flag);


@interface ToolView : UIView<UITextViewDelegate,AVAudioRecorderDelegate>


//設置MyTextBlock
-(void) setMyTextBlock:(MyTextBlock)block;

//設置聲音回調
-(void) setAudioVolumeBlock:(AudioVolumeBlock) block;

//設置錄音地址回調
-(void) setAudioURLBlock:(AudioURLBlock) block;

-(void)setContentSizeBlock:(ContentSizeBlock) block;

-(void)setCancelRecordBlock:(CancelRecordBlock)block;

-(void) changeFunctionHeight: (float) height;

@end
二、初始化ToolView中所需的控件
1.為了更好的封裝我們的組件,在.h中預留接口,在ToolView.m的延展中添加我們要使用的組件(私有屬性),延展代碼如下:
@interface ToolView()
//最左邊發送語音的按鈕
@property (nonatomic, strong) UIButton *voiceChangeButton;

//發送語音的按鈕
@property (nonatomic, strong) UIButton *sendVoiceButton;

//文本視圖
@property (nonatomic, strong) UITextView *sendTextView;

//切換鍵盤
@property (nonatomic, strong) UIButton *changeKeyBoardButton;

//More
@property (nonatomic, strong) UIButton *moreButton;

//鍵盤坐標系的轉換
@property (nonatomic, assign) CGRect endKeyBoardFrame;


//表情鍵盤
@property (nonatomic, strong) FunctionView *functionView;

//more
@property (nonatomic, strong) MoreView *moreView;

//數據model
@property (strong, nonatomic) ImageModelClass *imageMode;

@property (strong, nonatomic)HistoryImage *tempImage;


//傳輸文字的block回調
@property (strong, nonatomic) MyTextBlock textBlock;

//contentsinz
@property (strong, nonatomic) ContentSizeBlock sizeBlock;

//傳輸volome的block回調
@property (strong, nonatomic) AudioVolumeBlock volumeBlock;

//傳輸錄音地址
@property (strong, nonatomic) AudioURLBlock urlBlock;

//錄音取消
@property (strong, nonatomic) CancelRecordBlock cancelBlock;


//添加錄音功能的屬性
@property (strong, nonatomic) AVAudioRecorder *audioRecorder;

@property (strong, nonatomic) NSTimer *timer;
@property (strong, nonatomic) NSURL *audioPlayURL;

@end
2.接受相應的Block回調,把block傳入ToolView中,代碼如下:
-(void)setMyTextBlock:(MyTextBlock)block
{
 self.textBlock = block;
}

-(void)setAudioVolumeBlock:(AudioVolumeBlock)block
{
 self.volumeBlock = block;
}

-(void)setAudioURLBlock:(AudioURLBlock)block
{
 self.urlBlock = block;
}

-(void)setContentSizeBlock:(ContentSizeBlock)block
{
 self.sizeBlock = block;
}

-(void)setCancelRecordBlock:(CancelRecordBlock)block
{
 self.cancelBlock = block;
}
3.控件的初始化,純代碼添加ToolView中要用到的組件(分配內存,配置相應的屬性),因為是自定義組件的封裝,所以我們的storyboard就用不上啦,添加控件的代碼如下:
//控件的初始化
-(void) addSubview
{
 self.voiceChangeButton = [[UIButton alloc] initWithFrame:CGRectZero];
 [self.voiceChangeButton setImage:[UIImage imageNamed:@"chat_bottom_voice_press.png"] forState:UIControlStateNormal];
 [self.voiceChangeButton addTarget:self action:@selector(tapVoiceChangeButton:) forControlEvents:UIControlEventTouchUpInside];
 [self addSubview:self.voiceChangeButton];

 self.sendVoiceButton = [[UIButton alloc] initWithFrame:CGRectZero];
 [self.sendVoiceButton setBackgroundImage:[UIImage imageNamed:@"chat_bottom_textfield.png"] forState:UIControlStateNormal];
 [self.sendVoiceButton setTitleColor:[UIColor blackColor] forState:UIControlStateNormal];
 [self.sendVoiceButton setTitle:@"按住說話" forState:UIControlStateNormal];


 [self.sendVoiceButton addTarget:self action:@selector(tapSendVoiceButton:) forControlEvents:UIControlEventTouchUpInside];
 self.sendVoiceButton.hidden = YES;
 [self addSubview:self.sendVoiceButton];

 self.sendTextView = [[UITextView alloc] initWithFrame:CGRectZero];
 self.sendTextView.delegate = self;
 [self addSubview:self.sendTextView];

 self.changeKeyBoardButton = [[UIButton alloc] initWithFrame:CGRectZero];
 [self.changeKeyBoardButton setImage:[UIImage imageNamed:@"chat_bottom_smile_nor.png"] forState:UIControlStateNormal];
 [self.changeKeyBoardButton addTarget:self action:@selector(tapChangeKeyBoardButton:) forControlEvents:UIControlEventTouchUpInside];
 [self addSubview:self.changeKeyBoardButton];

 self.moreButton = [[UIButton alloc] initWithFrame:CGRectZero];
 [self.moreButton setImage:[UIImage imageNamed:@"chat_bottom_up_nor.png"] forState:UIControlStateNormal];
 [self.moreButton addTarget:self action:@selector(tapMoreButton:) forControlEvents:UIControlEventTouchUpInside];
 [self addSubview:self.moreButton];

 [self addDone];


 //實例化FunctionView
 self.functionView = [[FunctionView alloc] initWithFrame:CGRectMake(0, 0, 320, 216)];
 self.functionView.backgroundColor = [UIColor blackColor];

 //設置資源加載的文件名
 self.functionView.plistFileName = @"emoticons";

 __weak __block ToolView *copy_self = self;
 //獲取圖片並顯示
 [self.functionView setFunctionBlock:^(UIImage *image, NSString *imageText)
  {
   NSString *str = [NSString stringWithFormat:@"%@%@",copy_self.sendTextView.text, imageText];

   copy_self.sendTextView.text = str;

   //把使用過的圖片存入sqlite
   NSData *imageData = UIImagePNGRepresentation(image);
   [copy_self.imageMode save:imageData ImageText:imageText];
  }];


 //給sendTextView添加輕擊手勢
 UITapGestureRecognizer *tapGesture = [[UITapGestureRecognizer alloc] initWithTarget:self action:@selector(tapGesture:)];
 [self.sendTextView addGestureRecognizer:tapGesture];


 //給sendVoiceButton添加長按手勢
 UILongPressGestureRecognizer *longPress = [[UILongPressGestureRecognizer alloc] initWithTarget:self action:@selector(sendVoiceButtonLongPress:)];
 //設置長按時間
 longPress.minimumPressDuration = 0.2;
 [self.sendVoiceButton addGestureRecognizer:longPress];

 //實例化MoreView
 self.moreView = [[MoreView alloc] initWithFrame:CGRectMake(0, 0, 0, 0)];
 self.moreView.backgroundColor = [UIColor blackColor];
 [self.moreView setMoreBlock:^(NSInteger index) {
  NSLog(@"MoreIndex = %d",(int)index);
 }];


}
4.給我們的控件添加相應的約束,為了適合不同的屏幕,所以自動布局是少不了的。當然啦給控件添加約束也必須是手寫代碼啦,添加約束的代碼如下:
//給控件加約束
-(void)addConstraint
{
 //給voicebutton添加約束
 self.voiceChangeButton.translatesAutoresizingMaskIntoConstraints = NO;

 NSArray *voiceConstraintH = [NSLayoutConstraint constraintsWithVisualFormat:@"H:|-5-[_voiceChangeButton(30)]" options:0 metrics:0 views:NSDictionaryOfVariableBindings(_voiceChangeButton)];
 [self addConstraints:voiceConstraintH];

 NSArray *voiceConstraintV = [NSLayoutConstraint constraintsWithVisualFormat:@"V:|-8-[_voiceChangeButton(30)]" options:0 metrics:0 views:NSDictionaryOfVariableBindings(_voiceChangeButton)];
 [self addConstraints:voiceConstraintV];


 //給MoreButton添加約束
 self.moreButton.translatesAutoresizingMaskIntoConstraints = NO;

 NSArray *moreButtonH = [NSLayoutConstraint constraintsWithVisualFormat:@"H:[_moreButton(30)]-5-|" options:0 metrics:0 views:NSDictionaryOfVariableBindings(_moreButton)];
 [self addConstraints:moreButtonH];

 NSArray *moreButtonV = [NSLayoutConstraint constraintsWithVisualFormat:@"V:|-8-[_moreButton(30)]" options:0 metrics:0 views:NSDictionaryOfVariableBindings(_moreButton)];
 [self addConstraints:moreButtonV];


 //給changeKeyBoardButton添加約束
 self.changeKeyBoardButton.translatesAutoresizingMaskIntoConstraints = NO;

 NSArray *changeKeyBoardButtonH = [NSLayoutConstraint constraintsWithVisualFormat:@"H:[_changeKeyBoardButton(33)]-43-|" options:0 metrics:0 views:NSDictionaryOfVariableBindings(_changeKeyBoardButton)];
 [self addConstraints:changeKeyBoardButtonH];

 NSArray *changeKeyBoardButtonV = [NSLayoutConstraint constraintsWithVisualFormat:@"V:|-5-[_changeKeyBoardButton(33)]" options:0 metrics:0 views:NSDictionaryOfVariableBindings(_changeKeyBoardButton)];
 [self addConstraints:changeKeyBoardButtonV];


 //給文本框添加約束
 self.sendTextView.translatesAutoresizingMaskIntoConstraints = NO;
 NSArray *sendTextViewConstraintH = [NSLayoutConstraint constraintsWithVisualFormat:@"H:|-45-[_sendTextView]-80-|" options:0 metrics:0 views:NSDictionaryOfVariableBindings(_sendTextView)];
 [self addConstraints:sendTextViewConstraintH];

 NSArray *sendTextViewConstraintV = [NSLayoutConstraint constraintsWithVisualFormat:@"V:|-10-[_sendTextView]-10-|" options:0 metrics:0 views:NSDictionaryOfVariableBindings(_sendTextView)];
 [self addConstraints:sendTextViewConstraintV];


 //語音發送按鈕
 self.sendVoiceButton.translatesAutoresizingMaskIntoConstraints = NO;
 NSArray *sendVoiceButtonConstraintH = [NSLayoutConstraint constraintsWithVisualFormat:@"H:|-50-[_sendVoiceButton]-90-|" options:0 metrics:0 views:NSDictionaryOfVariableBindings(_sendVoiceButton)];
 [self addConstraints:sendVoiceButtonConstraintH];

 NSArray *sendVoiceButtonConstraintV = [NSLayoutConstraint constraintsWithVisualFormat:@"V:|-6-[_sendVoiceButton]-6-|" options:0 metrics:0 views:NSDictionaryOfVariableBindings(_sendVoiceButton)];
 [self addConstraints:sendVoiceButtonConstraintV];


}
5.因為我們要發送錄音,所以對音頻部分的初始化是少不了的,以下代碼是對音頻的初始化
//錄音部分初始化
-(void)audioInit
{
 NSError * err = nil;

 AVAudioSession *audioSession = [AVAudioSession sharedInstance];
 [audioSession setCategory :AVAudioSessionCategoryPlayAndRecord error:&err];

 if(err){
  NSLog(@"audioSession: %@ %d %@", [err domain], [err code], [[err userInfo] description]);
  return;
 }

 [audioSession setActive:YES error:&err];

 err = nil;
 if(err){
  NSLog(@"audioSession: %@ %d %@", [err domain], [err code], [[err userInfo] description]);
  return;
 }

 //通過可變字典進行配置項的加載
 NSMutableDictionary *setAudioDic = [[NSMutableDictionary alloc] init];

 //設置錄音格式(aac格式)
 [setAudioDic setValue:@(kAudioFormatMPEG4AAC) forKey:AVFormatIDKey];

 //設置錄音采樣率(Hz) 如:AVSampleRateKey==8000/44100/96000(影響音頻的質量)
 [setAudioDic setValue:@(44100) forKey:AVSampleRateKey];

 //設置錄音通道數1 Or 2
 [setAudioDic setValue:@(1) forKey:AVNumberOfChannelsKey];

 //線性采樣位數 8、16、24、32
 [setAudioDic setValue:@16 forKey:AVLinearPCMBitDepthKey];
 //錄音的質量
 [setAudioDic setValue:@(AVAudioQualityHigh) forKey:AVEncoderAudioQualityKey];

 NSString *strUrl = [NSSearchPathForDirectoriesInDomains(NSDocumentDirectory, NSUserDomainMask, YES) lastObject];

 NSString *fileName = [NSString stringWithFormat:@"%ld", (long)[[NSDate date] timeIntervalSince1970]];


 NSURL *url = [NSURL fileURLWithPath:[NSString stringWithFormat:@"%@/%@.aac", strUrl, fileName]];
 _audioPlayURL = url;

 NSError *error;
 //初始化
 self.audioRecorder = [[AVAudioRecorder alloc]initWithURL:url settings:setAudioDic error:&error];
 //開啟音量檢測
 self.audioRecorder.meteringEnabled = YES;
 self.audioRecorder.delegate = self;

}
6.添加鍵盤回收鍵Done
//給鍵盤添加done鍵
-(void) addDone
{
 //TextView的鍵盤定制回收按鈕
  UIToolbar * toolBar = [[UIToolbar alloc]initWithFrame:CGRectMake(0, 0, 320, 30)];

 UIBarButtonItem * item1 = [[UIBarButtonItem alloc]initWithBarButtonSystemItem:UIBarButtonSystemItemDone target:self action:@selector(tapDone:)];
 UIBarButtonItem * item2 = [[UIBarButtonItem alloc]initWithBarButtonSystemItem:UIBarButtonSystemItemFlexibleSpace target:nil action:nil];
  UIBarButtonItem * item3 = [[UIBarButtonItem alloc]initWithBarButtonSystemItem:UIBarButtonSystemItemFlexibleSpace target:nil action:nil];
 toolBar.items = @[item2,item1,item3];

  self.sendTextView.inputAccessoryView =toolBar;
}
三.編寫控件的回調方法
控件添加好以後下面要添加觸發控件要干的事情:
1.從最復雜的開始,長按發送錄音的按鈕時,會錄音。松開收時會發送(在發送時要判斷音頻的時間,太小不允許發送)。錄音時上滑取消錄音(刪除錄音文件)。主要是給錄音按鈕加了一個LongPress手勢,根據手勢的狀態來做不同的事情。關於手勢的內容請參考之前的博客:(iOS開發之手勢識別),下面是錄音業務邏輯的實現(個人在Coding的時候,感覺這一塊是工具條中最復雜的部分),代碼如下:
//長按手勢觸發的方法
-(void)sendVoiceButtonLongPress:(id)sender
{
 static int i = 1;
 if ([sender isKindOfClass:[UILongPressGestureRecognizer class]]) {

  UILongPressGestureRecognizer * longPress = sender;

  //錄音開始
  if (longPress.state == UIGestureRecognizerStateBegan)
  {

   i = 1;

   [self.sendVoiceButton setTitleColor:[UIColor redColor] forState:UIControlStateNormal];
   //錄音初始化
   [self audioInit];

   //創建錄音文件,准備錄音
   if ([self.audioRecorder prepareToRecord])
   {
    //開始
    [self.audioRecorder record];

    //設置定時檢測音量變化
    _timer = [NSTimer scheduledTimerWithTimeInterval:0.05 target:self selector:@selector(detectionVoice) userInfo:nil repeats:YES];
   }
  }


  //取消錄音
  if (longPress.state == UIGestureRecognizerStateChanged)
  {

   CGPoint piont = [longPress locationInView:self];
   NSLog(@"%f",piont.y);

   if (piont.y < -20)
   {
    if (i == 1) {

     [self.sendVoiceButton setBackgroundImage:[UIImage imageNamed:@"chat_bottom_textfield.png"] forState:UIControlStateNormal];
     [self.sendVoiceButton setTitleColor:[UIColor blackColor] forState:UIControlStateNormal];
     //刪除錄制文件
     [self.audioRecorder deleteRecording];
     [self.audioRecorder stop];
     [_timer invalidate];

     UIAlertView *alter = [[UIAlertView alloc] initWithTitle:@"提示" message:@"錄音取消" delegate:nil cancelButtonTitle:@"取消" otherButtonTitles: nil];
     [alter show];
     //去除圖片用的
     self.cancelBlock(1);
     i = 0;

    }


   }
   }

  if (longPress.state == UIGestureRecognizerStateEnded) {
   if (i == 1)
   {
    NSLog(@"錄音結束");
    [self.sendVoiceButton setBackgroundImage:[UIImage imageNamed:@"chat_bottom_textfield.png"] forState:UIControlStateNormal];
    [self.sendVoiceButton setTitleColor:[UIColor blackColor] forState:UIControlStateNormal];

    double cTime = self.audioRecorder.currentTime;
    if (cTime > 1)
    {
     //如果錄制時間<2 不發送
     NSLog(@"發出去");
     self.urlBlock(self.audioPlayURL);
    }
    else
    {
     //刪除記錄的文件
     [self.audioRecorder deleteRecording];
     UIAlertView *alter = [[UIAlertView alloc] initWithTitle:@"提示" message:@"錄音時間太短!" delegate:nil cancelButtonTitle:@"取消" otherButtonTitles: nil];
     [alter show];
     self.cancelBlock(1);

    }
    [self.audioRecorder stop];
    [_timer invalidate];
   }
  }


 }

}
2.下面的代碼是檢測音量的變化,用於根據音量變化圖片,代碼如下:
//錄音的音量探測
- (void)detectionVoice
{
 [self.audioRecorder updateMeters];//刷新音量數據
 //獲取音量的平均值 [recorder averagePowerForChannel:0];
 //音量的最大值 [recorder peakPowerForChannel:0];

 CGFloat lowPassResults = pow(10, (0.05 * [self.audioRecorder peakPowerForChannel:0]));

 //把聲音的音量傳給調用者
 self.volumeBlock(lowPassResults);
}
3.輕擊輸入框時,切換到系統鍵盤,代碼如下:
//輕擊sendText切換鍵盤
-(void)tapGesture:(UITapGestureRecognizer *) sender
{
 if ([self.sendTextView.inputView isEqual:self.functionView])
 {
  self.sendTextView.inputView = nil;

  [self.changeKeyBoardButton setImage:[UIImage imageNamed:@"chat_bottom_smile_nor.png"] forState:UIControlStateNormal];

  [self.sendTextView reloadInputViews];
 }

 if (![self.sendTextView isFirstResponder])
 {
  [self.sendTextView becomeFirstResponder];
 }
}
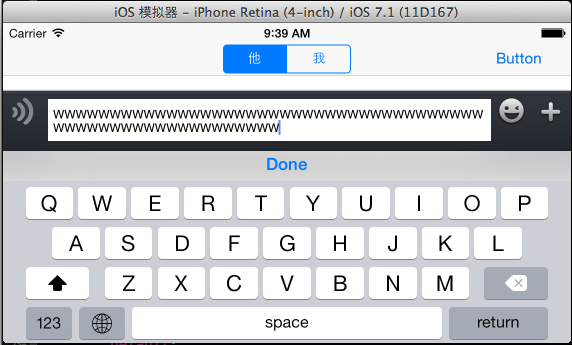
4.通過輸入框的文字多少改變toolView的高度,因為輸入框的約束是加在ToolView上的,所以需要把輸入框的ContentSize通過block傳到ToolView的調用者上,讓ToolView的父視圖來改變ToolView的高度,從而sendTextView的高度也會隨著改變的,下面的代碼是把ContentSize交給父視圖:代碼如下:
//通過文字的多少改變toolView的高度
-(void)textViewDidChange:(UITextView *)textView
{
 CGSize contentSize = self.sendTextView.contentSize;

 self.sizeBlock(contentSize);
}
效果如下,文字多時TextView的高度也會增大:
5.點擊最左邊的按鈕觸發的事件(切換文本輸入框和錄音按鈕),代碼如下:
//切換聲音按鍵和文字輸入框
-(void)tapVoiceChangeButton:(UIButton *) sender
{

 if (self.sendVoiceButton.hidden == YES)
 {
  self.sendTextView.hidden = YES;
  self.sendVoiceButton.hidden = NO;
  [self.voiceChangeButton setImage:[UIImage imageNamed:@"chat_bottom_keyboard_nor.png"] forState:UIControlStateNormal];

  if ([self.sendTextView isFirstResponder]) {
   [self.sendTextView resignFirstResponder];
  }
 }
 else
 {
  self.sendTextView.hidden = NO;
  self.sendVoiceButton.hidden = YES;
  [self.voiceChangeButton setImage:[UIImage imageNamed:@"chat_bottom_voice_press.png"] forState:UIControlStateNormal];

  if (![self.sendTextView isFirstResponder]) {
   [self.sendTextView becomeFirstResponder];
  }
 }
}
6.點擊return發送文字(通過Block回調傳入到父視圖上),代碼如下:
//發送信息(點擊return)
- (BOOL)textView:(UITextView *)textView shouldChangeTextInRange:(NSRange)range replacementText:(NSString *)text
{
 if ([text isEqualToString:@"\n"])
 {

  //通過block回調把text的值傳遞到Controller中共
  self.textBlock(self.sendTextView.text);

  self.sendTextView.text = @"";

  return NO;
 }
 return YES;
}
7.錄音按鈕本身要做的事情(在LongPress沒有被觸發時調用)代碼如下:
//發送聲音按鈕回調的方法
-(void)tapSendVoiceButton:(UIButton *) sender
{
 NSLog(@"sendVoiceButton");
 //點擊發送按鈕沒有觸發長按手勢要做的事兒
 UIAlertView *alter = [[UIAlertView alloc] initWithTitle:@"提示" message:@"按住錄音" delegate:nil cancelButtonTitle:@"取消" otherButtonTitles: nil];
 [alter show];
}
8.調用表情鍵盤:
//變成表情鍵盤
-(void)tapChangeKeyBoardButton:(UIButton *) sender
{
 if ([self.sendTextView.inputView isEqual:self.functionView])
 {
  self.sendTextView.inputView = nil;

  [self.changeKeyBoardButton setImage:[UIImage imageNamed:@"chat_bottom_smile_nor.png"] forState:UIControlStateNormal];

  [self.sendTextView reloadInputViews];
 }
 else
 {
  self.sendTextView.inputView = self.functionView;


  [self.changeKeyBoardButton setImage:[UIImage imageNamed:@"chat_bottom_keyboard_nor.png"] forState:UIControlStateNormal];

  [self.sendTextView reloadInputViews];
 }

 if (![self.sendTextView isFirstResponder])
 {
  [self.sendTextView becomeFirstResponder];
 }

 if (self.sendTextView.hidden == YES) {
  self.sendTextView.hidden = NO;
  self.sendVoiceButton.hidden = YES;
  [self.voiceChangeButton setImage:[UIImage imageNamed:@"chat_bottom_voice_press.png"] forState:UIControlStateNormal];

 }

}
以上就是ToolView的所有封裝代碼,至於在Controller中如何使用他來發送消息,如何定義聊天Cell,如何處理錄音文件,聊天時的氣泡是如何實現的等功能,在以後的文章中會繼續講解,希望大家繼續關注。
- 上一頁:iOS實現側拉欄抽屜效果
- 下一頁:iOS實現簡易抽屜效果、雙邊抽屜效果